Jira DVCS connector (FREE)
Use the Jira DVCS (distributed version control system) connector if you self-host your Jira instance, and you want to sync information between GitLab and Jira. If you use Jira Cloud, you should use the GitLab.com for Jira Cloud app unless you specifically need the DVCS connector.
When you configure the Jira DVCS connector, make sure your GitLab and Jira instances are accessible.
- Self-managed GitLab: Your GitLab instance must be accessible by Jira.
- Jira Server: Your network must allow access to your instance.
- Jira Cloud: Your instance must be accessible through the internet.
Smart Commits
When connecting GitLab with Jira with DVCS, you can process your Jira issues using special commands, called Smart Commits, in your commit messages. With Smart Commits, you can:
- Comment on issues.
- Record time-tracking information against issues.
- Transition issues to any status defined in the Jira project's workflow.
Commands must be in the first line of the commit message. The Jira Software documentation contains more information about how Smart Commits work, and what commands are available for your use.
For Smart Commits to work, the committing user on GitLab must have a corresponding user on Jira with the same email address or username.
Smart Commit syntax
Smart Commits should follow the pattern of:
<ISSUE_KEY> <ignored text> #<command> <optional command parameters>Some examples:
- Add a comment to a Jira issue:
KEY-123 fixes a bug #comment Bug is fixed. - Record time tracking:
KEY-123 #time 2w 4d 10h 52m Tracking work time. - Close an issue:
KEY-123 #close Closing issue
A Smart Commit message must not span more than one line (no carriage returns) but you can still perform multiple actions in a single commit. For example:
-
Add time tracking, add a comment, and transition to Closed:
KEY-123 #time 2d 5h #comment Task completed ahead of schedule #close -
Add a comment, transition to In-progress, and add time tracking:
KEY-123 #comment started working on the issue #in-progress #time 12d 5h
Configure a GitLab application for DVCS
We recommend you create and use a jira user in GitLab, and use the account
only for integration work. A separate account ensures regular account
maintenance does not affect your integration. If a jira user is not feasible,
you can set up this integration with your own account instead.
-
In GitLab, create a user for Jira to use to connect to GitLab. This user must be added to each project you want Jira to have access to, or be an administrator to access all projects.
-
Sign in as the
jirauser. -
On the top bar, in the top right corner, select the user's avatar, and select Edit profile.
-
On the left sidebar, select Applications.
-
In the Name field, enter a descriptive name for the integration, such as
Jira. -
In the Redirect URI field, enter the URI appropriate for your version of GitLab, replacing
<gitlab.example.com>with your GitLab instance domain:-
For GitLab versions 13.0 and later and Jira versions 8.14 and later, use the
generated
Redirect URLfrom Linking GitLab accounts with Jira. -
For GitLab versions 13.0 and later and Jira Cloud, use
https://<gitlab.example.com>/login/oauth/callback. -
For GitLab versions 11.3 and later and Jira versions 8.13 and earlier, use
https://<gitlab.example.com>/login/oauth/callback. If you use GitLab.com, the URL ishttps://gitlab.com/login/oauth/callback. -
For GitLab versions 11.2 and earlier, use
https://<gitlab.example.com>/-/jira/login/oauth/callback.
-
For GitLab versions 13.0 and later and Jira versions 8.14 and later, use the
generated
-
For Scopes, select
apiand clear any other checkboxes.- The DVCS connector requires a write-enabled
apiscope to automatically create and manage required webhooks.
- The DVCS connector requires a write-enabled
-
Select Submit.
-
Copy the Application ID and Secret values. You need them to configure Jira.
Configure Jira for DVCS
Configure this connection when you want to import all GitLab commits and branches, for the groups you specify, into Jira. This import takes a few minutes and, after it completes, refreshes every 60 minutes:
-
Complete the GitLab configuration.
-
Go to your DVCS accounts:
- For Jira Server, select Settings (gear) > Applications > DVCS accounts.
- For Jira Cloud, select Settings (gear) > Products > DVCS accounts.
-
To create a new integration, select the appropriate value for Host:
- For Jira versions 8.14 and later: Select GitLab or GitLab Self-Managed.
- For Jira Cloud or Jira versions 8.13 and earlier: Select GitHub Enterprise.
-
For Team or User Account, enter either:
-
For Jira versions 8.14 and later:
- The relative path of a top-level GitLab group that the GitLab user has access to.
-
For Jira Cloud or Jira versions 8.13 and earlier:
- The relative path of a top-level GitLab group that the GitLab user has access to.
- The relative path of your personal namespace.
-
For Jira versions 8.14 and later:
-
In the Host URL field, enter the URI appropriate for your version of GitLab, replacing
<gitlab.example.com>with your GitLab instance domain:-
For GitLab versions 11.3 and later, use
https://<gitlab.example.com>. -
For GitLab versions 11.2 and earlier, use
https://<gitlab.example.com>/-/jira.
-
For GitLab versions 11.3 and later, use
-
For Client ID, use the Application ID value from the previous section.
-
For Client Secret, use the Secret value from the previous section.
-
Ensure that the rest of the checkboxes are selected.
-
To create the DVCS account, select Add and then Continue.
-
Jira redirects to GitLab where you have to confirm the authorization. GitLab then redirects back to Jira where the synced projects should display in the new account.
To connect additional GitLab projects from other GitLab top-level groups or personal namespaces, repeat the previous steps with additional Jira DVCS accounts.
After you configure the integration, read more about how to test and use it.
Refresh data imported to Jira
Jira imports the commits and branches every 60 minutes for your projects. You can refresh the data manually from the Jira interface:
- Sign in to your Jira instance as the user you configured the integration with.
- Go to Settings (gear) > Applications.
- Select DVCS accounts.
- In the table, for the repository you want to refresh, in the Last Activity
column, select the icon:

Troubleshoot your DVCS connection
Refer to the items in this section if you're having problems with your DVCS connector.
Jira cannot access GitLab server
If you complete the Add New Account form, authorize access, and you receive this error, Jira and GitLab cannot connect. No other error messages appear in any logs:
Error obtaining access token. Cannot access https://gitlab.example.com from Jira.SSL and TLS problems
Problems with SSL and TLS can cause this error message:
Error obtaining access token. Cannot access https://gitlab.example.com from Jira.- The GitLab Jira integration requires GitLab to connect to Jira. Any TLS issues that arise from a private certificate authority or self-signed certificate are resolved on the GitLab server, as GitLab is the TLS client.
- The Jira Development panel integration requires Jira to connect to GitLab, which causes Jira to be the TLS client. If your GitLab server's certificate is not issued by a public certificate authority, add the appropriate certificate (such as your organization's root certificate) to the Java Truststore on Jira's server.
Refer to Atlassian's documentation and Atlassian Support for assistance setting up Jira correctly:
-
Add a certificate to the trust store.
- The simplest approach is
keytool. - Add additional roots to Java's default Truststore (
cacerts) to allow Jira to also trust public certificate authorities. - If the integration stops working after upgrading Jira's Java runtime, the
cacertsTruststore may have been replaced during the upgrade.
- The simplest approach is
-
Troubleshoot connectivity up to and including TLS handshaking, using the
SSLPokeJava class. -
Download the class from Atlassian's knowledge base to a directory on Jira's server, such as
/tmp. -
Use the same Java runtime as Jira.
-
Pass all networking-related parameters that Jira is called with, such as proxy settings or an alternative root Truststore (
-Djavax.net.ssl.trustStore):
${JAVA_HOME}/bin/java -Djavax.net.ssl.trustStore=/var/atlassian/application-data/jira/cacerts -classpath /tmp SSLPoke gitlab.example.com 443The message Successfully connected indicates a successful TLS handshake.
If there are problems, the Java TLS library generates errors that you can look up for more detail.
Scope error when connecting to Jira using DVCS
The requested scope is invalid, unknown, or malformed.Potential resolutions:
- Verify that the URL shown in the browser after being redirected from Jira in the
Jira DVCS connector setup includes
scope=apiin the query string. - If
scope=apiis missing from the URL, edit the GitLab account configuration. Review the Scopes field and ensure theapicheckbox is selected.
Jira error adding account and no repositories listed
After you complete the Add New Account form in Jira and authorize access, you might encounter these issues:
- An
Error! Failed adding the account: [Error retrieving list of repositories]error. - An
Account is already integrated with JIRAerror when you select Try Again. - An account is visible in the DVCS accounts view, but no repositories are listed.
To resolve this issue:
- If you're using GitLab Free, ensure you're using GitLab 13.4 or later.
- If you're using GitLab versions 11.10-12.7, upgrade to GitLab 12.8.10 or later to resolve an identified issue.
Contact GitLab Support if none of these reasons apply.
410 : Gone error when connecting to Jira
When you connect to Jira and synchronize repositories, you may receive a 410 : Gone error.
This issue occurs when you use the Jira DVCS connector and your integration is configured to use GitHub Enterprise.
For more information and possible fixes, see this issue.
Synchronization issues
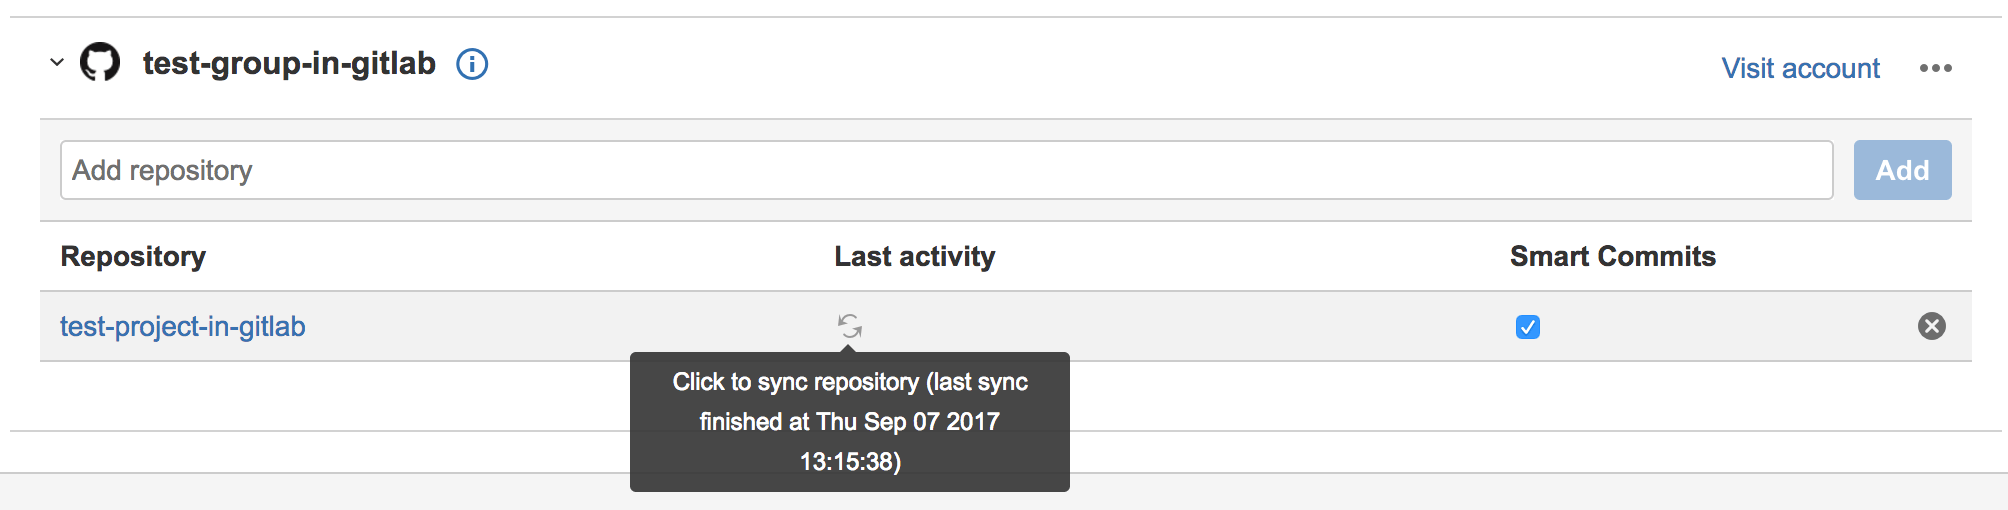
If Jira displays incorrect information, such as deleted branches, you may have to resynchronize the information:
- In Jira, select Jira Administration > Applications > DVCS accounts.
- For the account (group or subgroup), select Refresh repositories from the {ellipsis_h} (ellipsis) menu.
- For each project, next to the Last activity date:
- To perform a soft resync, select the sync icon.
- To complete a full sync, press
Shiftand select the sync icon.
For more information, read Atlassian's documentation.
Sync Failed error when refreshing repository data
If you get a Sync Failed error in Jira when refreshing repository data for specific projects, check your DVCS connector logs. Look for errors that occur when executing requests to API resources in GitLab. For example:
Failed to execute request [https://gitlab.com/api/v4/projects/:id/merge_requests?page=1&per_page=100 GET https://gitlab.com/api/v4/projects/:id/merge_requests?page=1&per_page=100 returned a response status of 403 Forbidden] errors:
{"message":"403 Forbidden"}
If you find a {"message":"403 Forbidden"} error, it is possible that this specific project has some GitLab features disabled.
In the example above, the merge requests feature is disabled.
To resolve the issue, enable the relevant feature:
- On the top bar, select Menu > Projects and find your project.
- On the left sidebar, select Settings > General.
- Expand Visibility, project features, permissions.
- Use the toggles to enable the features as needed.