Serverless (DEPRECATED) (FREE)
- Introduced in GitLab 11.5.
- Deprecated in GitLab 14.3.
WARNING: Serverless is currently in alpha.
Overview
Serverless architectures offer Operators and Developers the ability write highly scalable applications without provisioning a single server.
GitLab supports several ways deploy Serverless applications in both Kubernetes Environments and also major cloud Function as a Service (FaaS) environments.
Currently we support:
-
Knative: Build Knative applications with Knative and
gitlabktlon GKE and EKS. - AWS Lambda: Create serverless applications via the Serverless Framework and GitLab CI/CD.
Knative
Run serverless workloads on Kubernetes using Knative.
Knative extends Kubernetes to provide a set of middleware components that are useful to build modern, source-centric, container-based applications. Knative brings some significant benefits out of the box through its main components:
- Serving: Request-driven compute that can scale to zero.
- Eventing: Management and delivery of events.
For more information on Knative, visit the Knative docs repository.
With GitLab Serverless, you can deploy both FaaS and serverless applications.
Prerequisites
To run Knative on GitLab, you need:
-
Existing GitLab project: You need a GitLab project to associate all resources. The simplest way to get started:
- If you are planning on deploying functions, clone the functions example project to get started.
- If you are planning on deploying a serverless application, clone the sample Knative Ruby App to get started.
- Kubernetes Cluster: An RBAC-enabled Kubernetes cluster is required to deploy Knative. The simplest way to get started is to add a cluster using the GitLab GKE integration. The set of minimum recommended cluster specifications to run Knative is 3 nodes, 6 vCPUs, and 22.50 GB memory.
- GitLab Runner: A runner is required to run the CI jobs that deploy serverless applications or functions onto your cluster. You can install GitLab Runner onto the existing Kubernetes cluster.
- Domain Name: Knative provides its own load balancer using Istio, and an external IP address or hostname for all the applications served by Knative. Enter a wildcard domain to serve your applications. Configure your DNS server to use the external IP address or hostname for that domain.
-
.gitlab-ci.yml: GitLab uses Kaniko to build the application. We also use GitLab Knative tool CLI to simplify the deployment of services and functions to Knative. -
serverless.yml(for functions only): When using serverless to deploy functions, theserverless.ymlfile contains the information for all the functions being hosted in the repository as well as a reference to the runtime being used. -
Dockerfile(for applications only): Knative requires aDockerfilein order to build your applications. It should be included at the root of your project's repository and expose port8080.Dockerfileis not require if you plan to build serverless functions using our runtimes. - Prometheus (optional): The Prometheus cluster integration allows you to monitor the scale and traffic of your serverless function/application.
- Logging (optional): Configuring logging allows you to view and search request logs for your serverless function/application. See Configuring logging for more information.
Configuring Knative
Introduced in GitLab 12.0.
-
Follow the steps to add a Kubernetes cluster.
-
Ensure GitLab can manage Knative:
-
For a non-GitLab managed cluster, ensure that the service account for the token provided can manage resources in the
serving.knative.devAPI group. -
For a GitLab managed cluster, if you added the cluster in GitLab 12.1 or later, then GitLab already has the required access and you can proceed to the next step.
Otherwise, you need to manually grant the GitLab service account the ability to manage resources in the
serving.knative.devAPI group. Since every GitLab service account has theeditcluster role, the simplest way to do this is with an aggregated ClusterRole adding rules to the defaulteditcluster role: First, save the following YAML asknative-serving-only-role.yaml:apiVersion: rbac.authorization.k8s.io/v1 kind: ClusterRole metadata: name: knative-serving-only-role labels: rbac.authorization.k8s.io/aggregate-to-edit: "true" rules: - apiGroups: - serving.knative.dev resources: - configurations - configurationgenerations - routes - revisions - revisionuids - autoscalers - services verbs: - get - list - create - update - delete - patch - watchThen run the following command:
kubectl apply -f knative-serving-only-role.yamlAlternatively, permissions can be granted on a per-service account basis using
Roles andRoleBindings (see the Kubernetes RBAC documentation for more information).
-
-
Follow the steps to deploy functions or serverless applications onto your cluster.
-
Optional: For invocation metrics to show in GitLab, additional Istio metrics need to be configured in your cluster. For example, with Knative v0.9.0, you can use this manifest.
Supported runtimes
Serverless functions for GitLab can be run using:
- GitLab-managed runtimes.
- OpenFaaS runtimes.
If a runtime is not available for the required programming language, consider deploying a serverless application.
GitLab-managed runtimes
The following GitLab-managed runtimes are available:
-
go(proof of concept) nodejsruby
You must provide a Dockerfile to run serverless functions if no runtime is specified.
OpenFaaS runtimes
Introduced in GitLab 12.5.
OpenFaaS classic runtimes can be used with GitLab serverless.
OpenFaas runtimes are available for the following languages:
- C#
- Go
- NodeJS
- PHP
- Python
- Ruby
Runtimes are specified using the pattern: openfaas/classic/<template_name>. The following
example shows how to define a function in serverless.yml using an OpenFaaS runtime:
hello:
  source: ./hello
  runtime: openfaas/classic/ruby
  description: "Ruby function using OpenFaaS classic runtime"
handler is not needed for OpenFaaS functions. The location of the handler is defined
by the conventions of the runtime.
See the ruby-openfaas-function
project for an example of a function using an OpenFaaS runtime.
Deploying functions
Introduced in GitLab 11.6.
You can find and import all the files referenced in this doc in the functions example project.
Follow these steps to deploy a function using the Node.js runtime to your Knative instance (you can skip these steps if you've cloned the example project):
-
Create a directory to house the function. In this example we will create a directory called
echoat the root of the project. -
Create the file to contain the function code. In this example, our file is called
echo.jsand is located inside theechodirectory. If your project is:- Public, continue to the next step.
- Private, you must create a GitLab deploy token with
gitlab-deploy-tokenas the name and theread_registryscope.
-
.gitlab-ci.yml: this defines a pipeline used to deploy your functions. It must be included at the root of your repository:include: - template: Serverless.gitlab-ci.yml functions:build: extends: .serverless:build:functions environment: production functions:deploy: extends: .serverless:deploy:functions environment: productionThis
.gitlab-ci.ymlcreates jobs that invoke some predefined commands to build and deploy your functions to your cluster.Serverless.gitlab-ci.ymlis a template that allows customization. You can either import it withincludeparameter and useextendsto customize your jobs, or you can inline the entire template by choosing it from Apply a template dropdown when editing the.gitlab-ci.ymlfile through the user interface. -
serverless.yml: this file contains the metadata for your functions, such as name, runtime, and environment.It must be included at the root of your repository. The following is a sample
echofunction which shows the required structure for the file.You can find the relevant files for this project in the functions example project.
service: functions
description: "GitLab Serverless functions using Knative"

provider:
  name: triggermesh
  envs:
    FOO: value
  secrets:
    - my-secrets

functions:
  echo-js:
    handler: echo-js
    source: ./echo-js
    runtime: gitlab/runtimes/nodejs
    description: "node.js runtime function"
    envs:
      MY_FUNCTION: echo-js
    secrets:
      - my-secrets
Explanation of the fields used above:
service
| Parameter | Description |
|---|---|
service |
Name for the Knative service which serves the function. |
description |
A short description of the service. |
provider
| Parameter | Description |
|---|---|
name |
Indicates which provider is used to execute the serverless.yml file. In this case, the TriggerMesh middleware. |
envs |
Includes the environment variables to be passed as part of function execution for all functions in the file, where FOO is the variable name and BAR are the variable contents. You may replace this with your own variables. |
secrets |
Includes the contents of the Kubernetes secret as environment variables accessible to be passed as part of function execution for all functions in the file. The secrets are expected in INI format. |
functions
In the serverless.yml example above, the function name is echo and the
subsequent lines contain the function attributes.
| Parameter | Description |
|---|---|
handler |
The function's name. |
source |
Directory with sources of a functions. |
runtime (optional) |
The runtime to be used to execute the function. This can be a runtime alias (see Runtime aliases), or it can be a full URL to a custom runtime repository. When the runtime is not specified, we assume that Dockerfile is present in the function directory specified by source. |
description |
A short description of the function. |
envs |
Sets an environment variable for the specific function only. |
secrets |
Includes the contents of the Kubernetes secret as environment variables accessible to be passed as part of function execution for the specific function only. The secrets are expected in INI format. |
Deployment
Runtime aliases
The optional runtime parameter can refer to one of the following runtime aliases (also see Supported runtimes):
| Runtime alias | Maintained by |
|---|---|
gitlab/runtimes/go |
GitLab |
gitlab/runtimes/nodejs |
GitLab |
gitlab/runtimes/ruby |
GitLab |
openfaas/classic/csharp |
OpenFaaS |
openfaas/classic/go |
OpenFaaS |
openfaas/classic/node |
OpenFaaS |
openfaas/classic/php7 |
OpenFaaS |
openfaas/classic/python |
OpenFaaS |
openfaas/classic/python3 |
OpenFaaS |
openfaas/classic/ruby |
OpenFaaS |
After the .gitlab-ci.yml template has been added and the serverless.yml file
has been created, pushing a commit to your project results in a CI pipeline
being executed which deploys each function as a Knative service. After the
deploy stage has finished, additional details for the function display
under Infrastructure > Serverless platform.
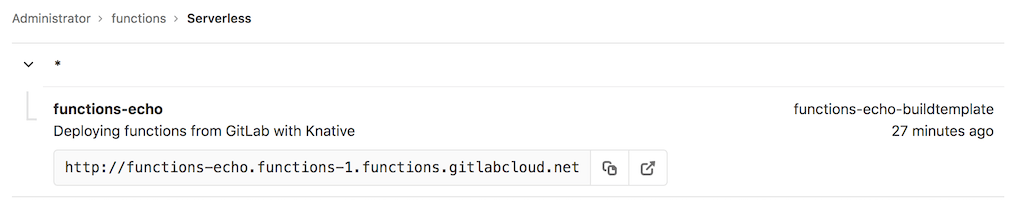
This page contains all functions available for the project, the description for accessing the function, and, if available, the function's runtime information. The details are derived from the Knative installation inside each of the project's Kubernetes cluster. Click on each function to obtain detailed scale and invocation data.
The function details can be retrieved directly from Knative on the cluster:
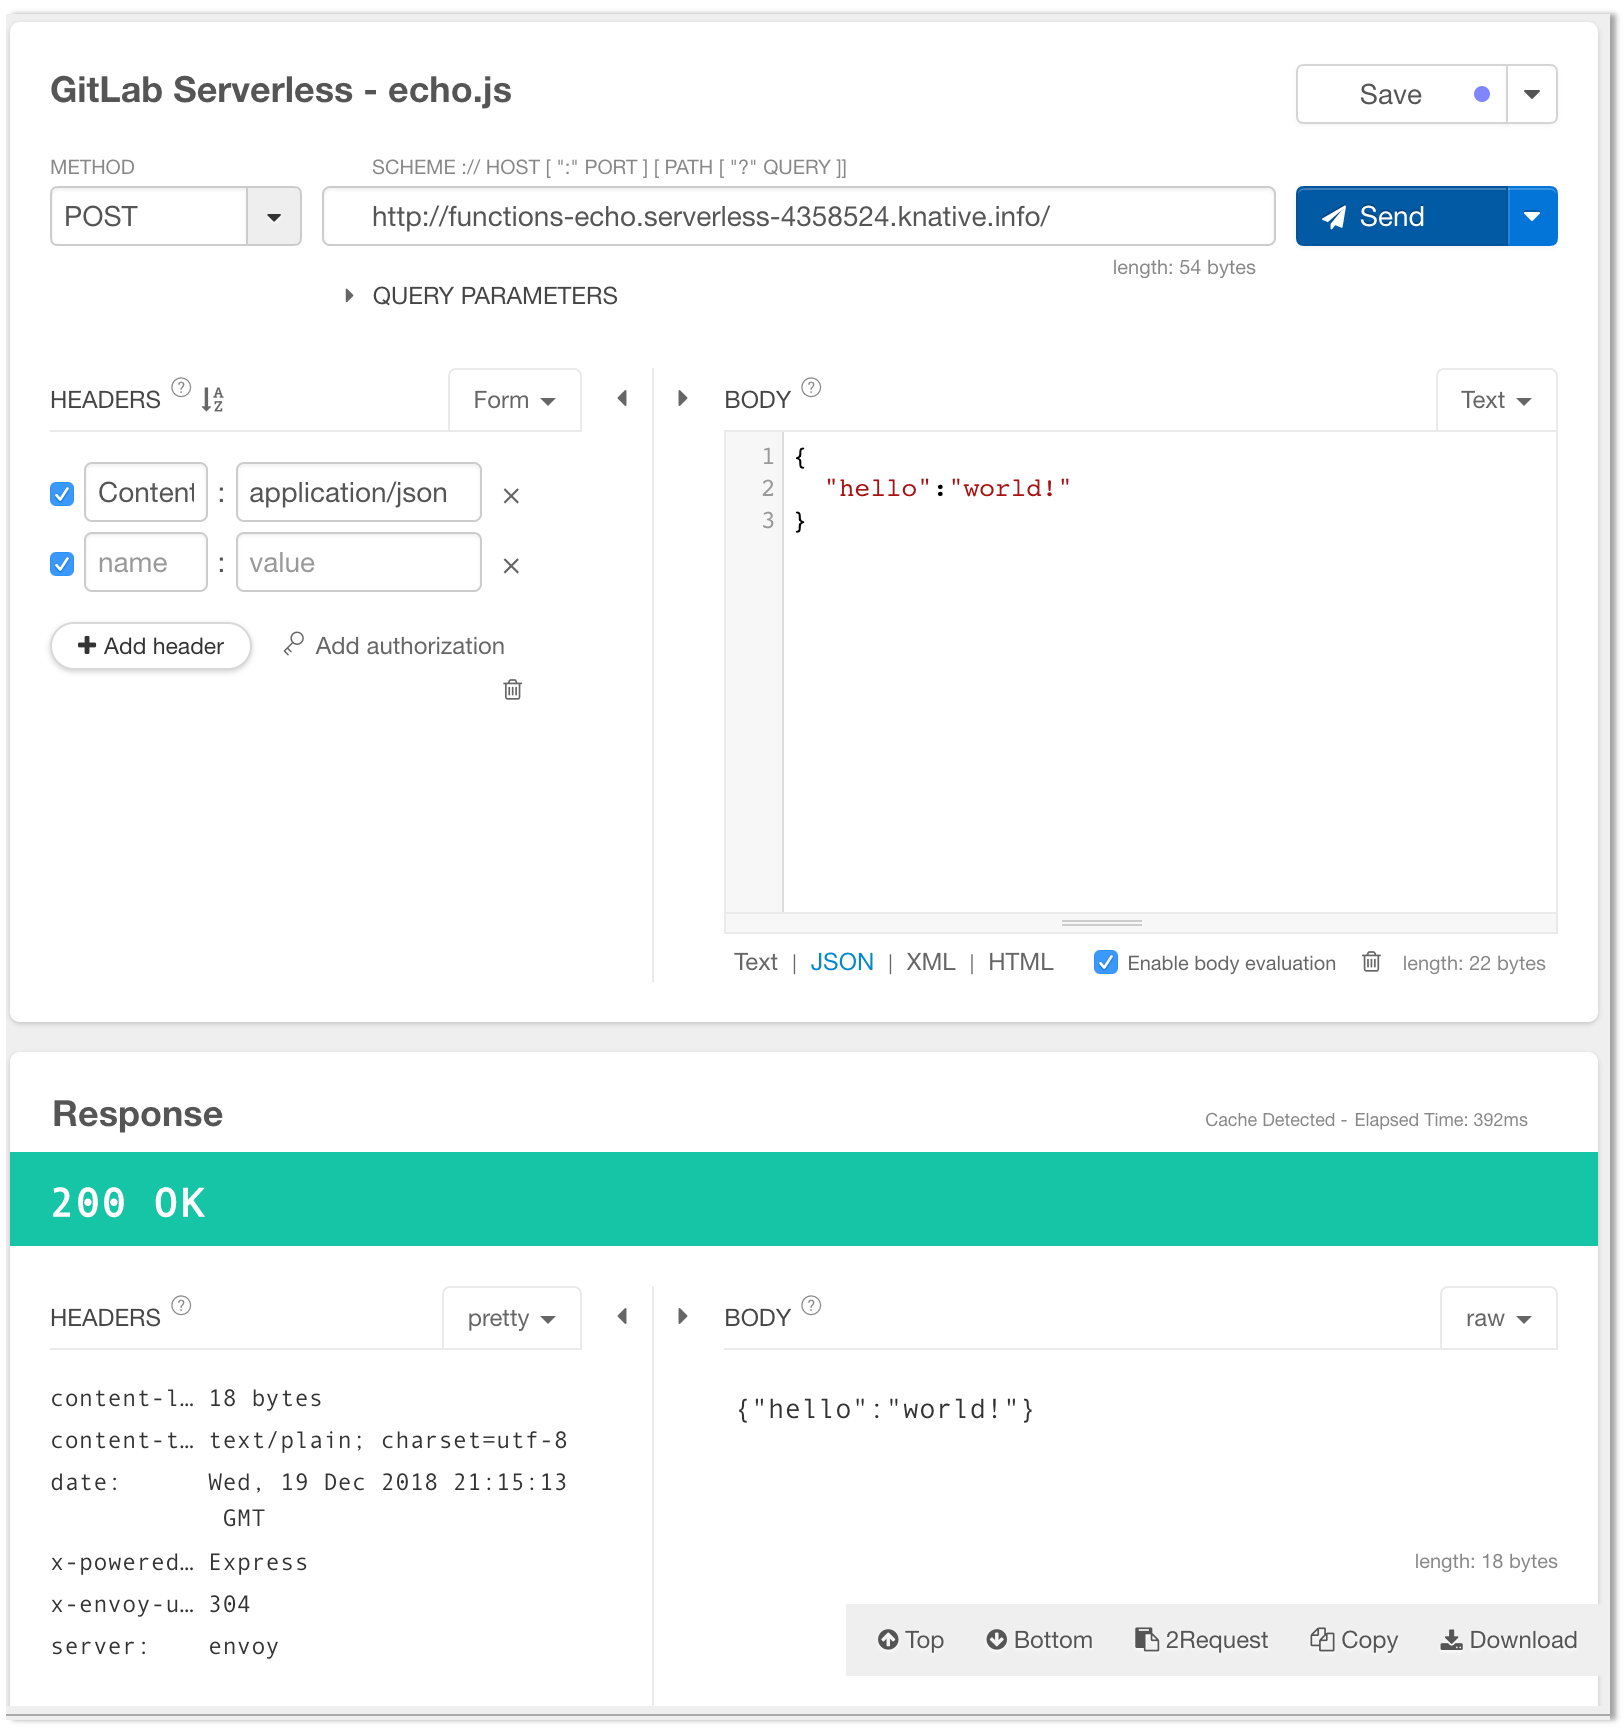
kubectl -n "$KUBE_NAMESPACE" get services.serving.knative.devThe sample function can now be triggered from any HTTP client using a simple POST call:
-
Using curl (replace the URL on the last line with the URL of your application):
curl \ --header "Content-Type: application/json" \ --request POST \ --data '{"GitLab":"FaaS"}' \ "http://functions-echo.functions-1.functions.example.com/" -
Using a web-based tool (such as Postman or Restlet)

Secrets
To access your Kubernetes secrets from within your function, the secrets should be created under the namespace of your serverless deployment and specified in your serverless.yml file as above.
You can create secrets in several ways. The following sections show some examples.
CLI example
kubectl create secret generic my-secrets -n "$KUBE_NAMESPACE" --from-literal MY_SECRET=imverysecurePart of deployment job
You can extend your .gitlab-ci.yml to create the secrets during deployment using the CI/CD variables
stored securely under your GitLab project.
deploy:function:
  stage: deploy
  environment: production
  extends: .serverless:deploy:functions
  before_script:
    - kubectl create secret generic my-secret
        --from-literal MY_SECRET="$GITLAB_SECRET_VARIABLE"
        --namespace "$KUBE_NAMESPACE"
        --dry-run -o yaml | kubectl apply -f -
Running functions locally
Running a function locally is a good way to quickly verify behavior during development.
Running functions locally requires:
-
Go 1.12 or newer installed.
-
Docker Engine installed and running.
-
gitlabktlinstalled using the Go package manager:GO111MODULE=on go get gitlab.com/gitlab-org/gitlabktl
To run a function locally:
-
Navigate to the root of your GitLab serverless project.
-
Build your function into a Docker image:
gitlabktl serverless build -
Run your function in Docker:
docker run -itp 8080:8080 <your_function_name> -
Invoke your function:
curl "http://localhost:8080"
Deploying Serverless applications
Introduced in GitLab 11.5.
Serverless applications are an alternative to serverless functions. They're useful in scenarios where an existing runtime does not meet the needs of an application, such as one written in a language that has no runtime available. Note though that serverless applications should be stateless.
You can reference and import the sample Knative Ruby App
to get started. Add the following .gitlab-ci.yml to the root of your repository
(you may skip this step if you've previously cloned the previously mentioned,
sample Knative Ruby App):
include:
  - template: Serverless.gitlab-ci.yml

build:
  extends: .serverless:build:image

deploy:
  extends: .serverless:deploy:image
Serverless.gitlab-ci.yml is a template that allows customization.
You can either import it with include parameter and use extends to
customize your jobs, or you can inline the entire template by choosing it
from Apply a template dropdown when editing the .gitlab-ci.yml file through
the user interface.
A serverless.yml file is not required when deploying serverless applications.
Deploy the application with Knative
With all the pieces in place, the next time a CI pipeline runs the Knative application deploys. Navigate to CI/CD > Pipelines and click the most recent pipeline.
Function details
Go to the Infrastructure > Serverless platform page to see the final URL of your functions.

Invocation metrics
On the same page as above, click on one of the function rows to bring up the function details page.
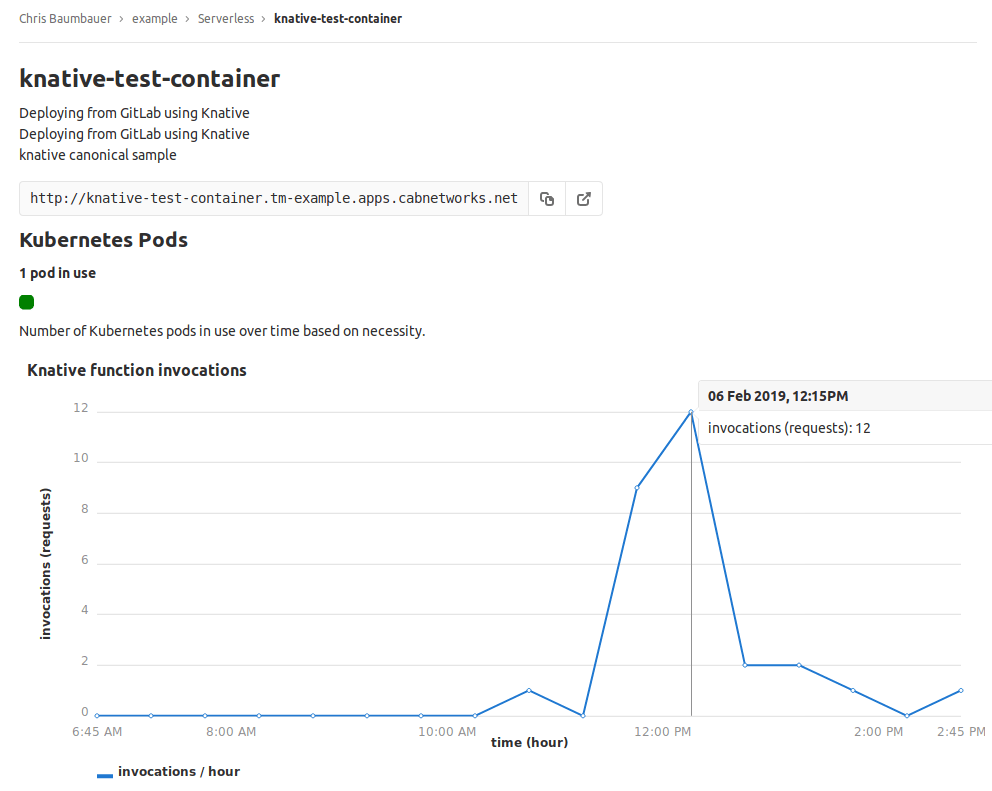
The pod count gives you the number of pods running the serverless function instances on a given cluster.
For the Knative function invocations to appear, the Prometheus cluster integration must be enabled.
Once Prometheus is enabled, a message may appear indicating that the metrics data is loading or is not available at this time. It appears upon the first access of the page, but should go away after a few seconds. If the message does not disappear, then it is possible that GitLab is unable to connect to the Prometheus instance running on the cluster.
Configuring logging
Introduced in GitLab 12.5.
Prerequisites
- A GitLab-managed cluster.
-
kubectlinstalled and working.
Running kubectl commands on your cluster requires setting up access to the
cluster first. For clusters created on:
- GKE, see GKE Cluster Access
- Other platforms, see Install and Set Up kubectl.
Enable request log template
Run the following command to enable request logs:
kubectl edit cm -n knative-serving config-observabilityCopy the logging.request-log-template from the data._example field to the data field one level up in the hierarchy.
Enable request logs
Run the following commands to install Elasticsearch, Kibana, and Filebeat into a kube-logging namespace and configure all nodes to forward logs using Filebeat:
kubectl apply -f https://gitlab.com/gitlab-org/serverless/configurations/knative/raw/v0.7.0/kube-logging-filebeat.yaml
kubectl label nodes --all beta.kubernetes.io/filebeat-ready="true"
Viewing request logs
To view request logs:
- Run
kubectl proxy. - Navigate to Kibana UI.
Or:
- Open the Kibana UI.
- Click on Discover, then select
filebeat-*from the dropdown on the left. - Enter
kubernetes.container.name:"queue-proxy" AND message:/httpRequest/into the search box.
Enabling TLS for Knative services
By default, a GitLab serverless deployment is served over http. To serve
over https, you must manually obtain and install TLS certificates.
The simplest way to accomplish this is to use Certbot to manually obtain Let's Encrypt certificates. Certbot is a free, open source software tool for automatically using Let's Encrypt certificates on manually-administered websites to enable HTTPS.
The following instructions relate to installing and running Certbot on a Linux server that has Python 3 installed, and may not work on other operating systems or with other versions of Python.
-
Install Certbot by running the
certbot-autowrapper script. On the command line of your server, run the following commands:wget https://dl.eff.org/certbot-auto sudo mv certbot-auto /usr/local/bin/certbot-auto sudo chown root /usr/local/bin/certbot-auto sudo chmod 0755 /usr/local/bin/certbot-auto /usr/local/bin/certbot-auto --helpTo check the integrity of the
certbot-autoscript, run:wget -N https://dl.eff.org/certbot-auto.asc gpg2 --keyserver ipv4.pool.sks-keyservers.net --recv-key A2CFB51FA275A7286234E7B24D17C995CD9775F2 gpg2 --trusted-key 4D17C995CD9775F2 --verify certbot-auto.asc /usr/local/bin/certbot-autoThe output of the last command should look something like:
gpg: Signature made Mon 10 Jun 2019 06:24:40 PM EDT gpg: using RSA key A2CFB51FA275A7286234E7B24D17C995CD9775F2 gpg: key 4D17C995CD9775F2 marked as ultimately trusted gpg: checking the trustdb gpg: marginals needed: 3 completes needed: 1 trust model: pgp gpg: depth: 0 valid: 1 signed: 0 trust: 0-, 0q, 0n, 0m, 0f, 1u gpg: next trustdb check due at 2027-11-22 gpg: Good signature from "Let's Encrypt Client Team <letsencrypt-client@eff.org>" [ultimate] -
Run the following command to use Certbot to request a certificate using DNS challenge during authorization:
/usr/local/bin/certbot-auto certonly --manual --preferred-challenges dns -d '*.<namespace>.example.com'Where
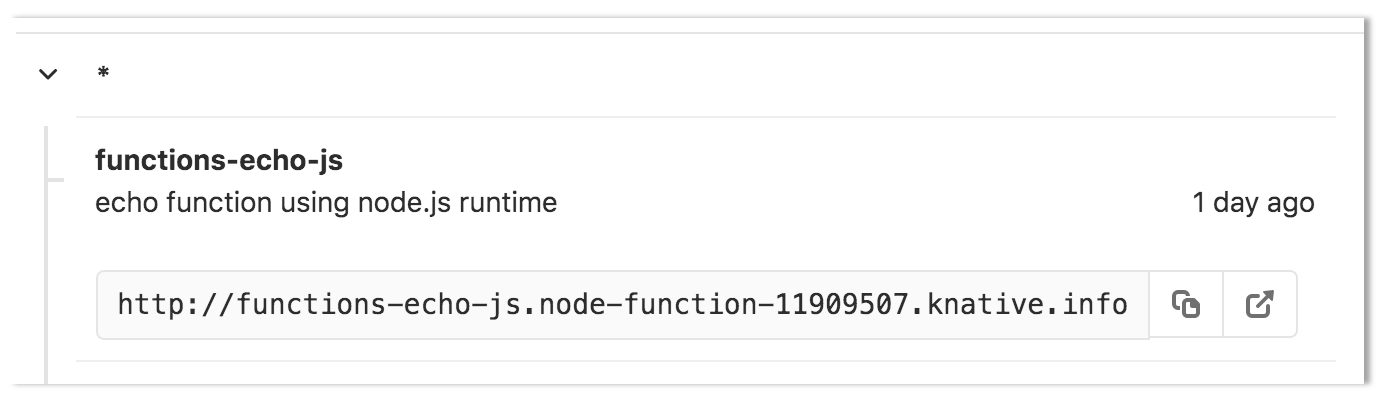
<namespace>is the namespace created by GitLab for your serverless project (composed of<project_name>-<project_id>-<environment>) andexample.comis the domain being used for your project. If you are unsure what the namespace of your project is, navigate to the Infrastructure > Serverless platform page of your project and inspect the endpoint provided for your function/app.In the above image, the namespace for the project is
node-function-11909507and the domain isknative.info, thus certificate request line would look like this:./certbot-auto certonly --manual --preferred-challenges dns -d '*.node-function-11909507.knative.info'The Certbot tool walks you through the steps of validating that you own each domain that you specify by creating TXT records in those domains. After this process is complete, the output should look something like this:
IMPORTANT NOTES: - Congratulations! Your certificate and chain have been saved at: /etc/letsencrypt/live/namespace.example.com/fullchain.pem Your key file has been saved at: /etc/letsencrypt/live/namespace.example/privkey.pem Your cert will expire on 2019-09-19. To obtain a new or tweaked version of this certificate in the future, simply run certbot-auto again. To non-interactively renew *all* of your certificates, run "certbot-auto renew" -----BEGIN PRIVATE KEY----- - Your account credentials have been saved in your Certbot configuration directory at /etc/letsencrypt. You should make a secure backup of this folder now. This configuration directory will also contain certificates and private keys obtained by Certbot so making regular backups of this folder is ideal. -
Create certificate and private key files. Using the contents of the files returned by Certbot, create two files in order to create the Kubernetes secret:
Run the following command to see the contents of
fullchain.pem:sudo cat /etc/letsencrypt/live/node-function-11909507.knative.info/fullchain.pemOutput should look like this:
-----BEGIN CERTIFICATE-----
2fcb195768c39e9a94cec2c2e32c59c0aad7a3365c10892e8116b5d83d4096b6
04f294d1eaca42b8692017b426d53bbc8fe75f827734f0260710b83a556082df
2fcb195768c39e9a94cec2c2e32c59c0aad7a3365c10892e8116b5d83d4096b6
04f294d1eaca42b8692017b426d53bbc8fe75f827734f0260710b83a556082df
2fcb195768c39e9a94cec2c2e32c59c0aad7a3365c10892e8116b5d83d4096b6
04f294d1eaca42b8692017b426d53bbc8fe75f827734f0260710b83a556082df
2fcb195768c39e9a94cec2c2e32c59c0aad7a3365c10892e8116b5d83d4096b6
04f294d1eaca42b8692017b426d53bbc8fe75f827734f0260710b83a556082df
2fcb195768c39e9a94cec2c2e32c59c0aad7a3365c10892e8116b5d83d4096b6
04f294d1eaca42b8692017b426d53bbc8fe75f827734f0260710b83a556082df
2fcb195768c39e9a94cec2c2e32c59c0aad7a3365c10892e8116b5d83d4096b6
04f294d1eaca42b8692017b426d53bbc8fe75f827734f0260710b83a556082df
2fcb195768c39e9a94cec2c2e32c59c0aad7a3365c10892e8116b5d83d4096b6
04f294d1eaca42b8692017b426d53bbc8fe75f827734f0260710b83a556082df
2fcb195768c39e9a94cec2c2e32c59c0aad7a3365c10892e8116b5d83d4096b6
04f294d1eaca42b8692017b426d53bbc8fe75f827734f0260710b83a556082df
2fcb195768c39e9a94cec2c2e32c59c0aad7a3365c10892e8116b5d83d4096b6
04f294d1eaca42b8692017b426d53bbc8fe75f827734f0260710b83a556082df
2fcb195768c39e9a94cec2c2e32c59c0aad7a3365c10892e8116b5d83d4096b6
04f294d1eaca42b8692017b426d53bbc8fe75f827734f0260710b83a556082df
2fcb195768c39e9a94cec2c2e32c59c0aad7a3365c10892e8116b5d83d4096b6
04f294d1eaca42b8692017b426d53bbc8fe75f827734f0260710b83a556082df
2fcb195768c39e9a94cec2c2e32c59c0aad7a3365c10892e8116b5d83d4096b6
04f294d1eaca42b8692017b426d53bbc8fe75f827734f0260710b83a556082df
2fcb195768c39e9a94cec2c2e32c59c0aad7a3365c10892e8116b5d83d4096b6
04f294d1eaca42b8692017b426d53bbc8fe75f827734f0260710b83a556082df
2fcb195768c39e9a94cec2c2e32c59c0aad7a3365c10892e8116b5d83d4096b6
04f294d1eaca42b8692017b426d53bbc8fe75f827734f0260710b83a556082df
2fcb195768c39e9a94cec2c2e32c59c0aad7a3365c10892e8116b5d83d4096b6
04f294d1eaca42b8692017b4ag==
-----END CERTIFICATE-----
-----BEGIN CERTIFICATE-----
2fcb195768c39e9a94cec2c2e32c59c0aad7a3365c10892e8116b5d83d4096b6
04f294d1eaca42b8692017b426d53bbc8fe75f827734f0260710b83a556082df
2fcb195768c39e9a94cec2c2e32c59c0aad7a3365c10892e8116b5d83d4096b6
04f294d1eaca42b8692017b426d53bbc8fe75f827734f0260710b83a556082df
2fcb195768c39e9a94cec2c2e32c59c0aad7a3365c10892e8116b5d83d4096b6
04f294d1eaca42b8692017b426d53bbc8fe75f827734f0260710b83a556082df
2fcb195768c39e9a94cec2c2e32c59c0aad7a3365c10892e8116b5d83d4096b6
04f294d1eaca42b8692017b426d53bbc8fe75f827734f0260710b83a556082df
2fcb195768c39e9a94cec2c2e32c59c0aad7a3365c10892e8116b5d83d4096b6
04f294d1eaca42b8692017b426d53bbc8fe75f827734f0260710b83a556082df
2fcb195768c39e9a94cec2c2e32c59c0aad7a3365c10892e8116b5d83d4096b6
04f294d1eaca42b8692017b426d53bbc8fe75f827734f0260710b83a556082df
2fcb195768c39e9a94cec2c2e32c59c0aad7a3365c10892e8116b5d83d4096b6
04f294d1eaca42b8692017b426d53bbc8fe75f827734f0260710b83a556082df
2fcb195768c39e9a94cec2c2e32c59c0aad7a3365c10892e8116b5d83d4096b6
04f294d1eaca42b8692017b426d53bbc8fe75f827734f0260710b83a556082df
2fcb195768c39e9a94cec2c2e32c59c0aad7a3365c10892e8116b5d83d4096b6
04f294d1eaca42b8692017b426d53bbc8fe75f827734f0260710b83a556082df
2fcb195768c39e9a94cec2c2e32c59c0aad7a3365c10892e8116b5d83d4096b6
04f294d1eaca42b8692017b426d53bbc8fe75f827734f0260710b83a556082df
2fcb195768c39e9a94cec2c2e32c59c0aad7a3365c10892e8116b5d83d4096b6
04f294d1eaca42b8692017b426d53bbc8fe75f827734f0260710b83a556082df
2fcb195768c39e9a94cec2c2e32c59c0aad7a3365c10892e8116b5d83d4096b6
04f294d1eaca42b8692017b426d53bbc8fe75f827734f0260710b83a556082df
K2fcb195768c39e9a94cec2c2e30Qg==
-----END CERTIFICATE-----
Create a file with the name
cert.pemwith the contents of the entire output.Once
cert.pemis created, run the following command to see the contents ofprivkey.pem:sudo cat /etc/letsencrypt/live/namespace.example/privkey.pemOutput should look like this:
-----BEGIN PRIVATE KEY-----
2fcb195768c39e9a94cec2c2e32c59c0aad7a3365c10892e8116b5d83d4096b6
04f294d1eaca42b8692017b426d53bbc8fe75f827734f0260710b83a556082df
2fcb195768c39e9a94cec2c2e32c59c0aad7a3365c10892e8116b5d83d4096b6
04f294d1eaca42b8692017b426d53bbc8fe75f827734f0260710b83a556082df
2fcb195768c39e9a94cec2c2e32c59c0aad7a3365c10892e8116b5d83d4096b6
04f294d1eaca42b8692017b426d53bbc8fe75f827734f0260710b83a556082df
2fcb195768c39e9a94cec2c2e32c59c0aad7a3365c10892e8116b5d83d4096b6
04f294d1eaca42b8692017b426d53bbc8fe75f827734f0260710b83a556082df
2fcb195768c39e9a94cec2c2e32c59c0aad7a3365c10892e8116b5d83d4096b6
04f294d1eaca42b8692017b426d53bbc8fe75f827734f0260710b83a556082df
2fcb195768c39e9a94cec2c2e32c59c0aad7a3365c10892e8116b5d83d4096b6
04f294d1eaca42b8692017b426d53bbc8fe75f827734f0260710b83a556082df
2fcb195768c39e9a94cec2c2e32c59c0aad7a3365c10892e8116b5d83d4096b6
04f294d1eaca42b8692017b426d53bbc8fe75f827734f0260710b83a556082df
2fcb195768c39e9a94cec2c2e32c59c0aad7a3365c10892e8116b5d83d4096b6
04f294d1eaca42b8692017b426d53bbc8fe75f827734f0260710b83a556082df
2fcb195768c39e9a94cec2c2e32c59c0aad7a3365c10892e8116b5d83d4096b6
04f294d1eaca42b8692017b426d53bbc8fe75f827734f0260710b83a556082df
2fcb195768c39e9a94cec2c2e32c59c0aad7a3365c10892e8116b5d83d4096b6
04f294d1eaca42b8692017b426d53bbc8fe75f827734f0260710b83a556082df
2fcb195768c39e9a94cec2c2e32c59c0aad7a3365c10892e8116b5d83d4096b6
04f294d1eaca42b8692017b426d53bbc8fe75f827734f0260710b83a556082df
2fcb195768c39e9a94cec2c2e32c59c0aad7a3365c10892e8116b5d83d4096b6
04f294d1eaca42b8692017b426d53bbc8fe75f827734f0260710b83a556082df
-----BEGIN CERTIFICATE-----
fcb195768c39e9a94cec2c2e32c59c0aad7a3365c10892e8116b5d83d4096b6
4f294d1eaca42b8692017b4262==
-----END PRIVATE KEY-----
Create a new file with the name
cert.pkwith the contents of the entire output. -
Create a Kubernetes secret to hold your TLS certificate,
cert.pem, and the private keycert.pk:NOTE: Running
kubectlcommands on your cluster requires setting up access to the cluster first. For clusters created on GKE, see GKE Cluster Access. For other platforms, installkubectl.kubectl create --namespace istio-system secret tls istio-ingressgateway-certs \ --key cert.pk \ --cert cert.pemWhere
cert.pemandcert.pkare your certificate and private key files. Note that theistio-ingressgateway-certssecret name is required. -
Configure Knative to use the new secret that you created for HTTPS connections. Run the following command to open the Knative shared
gatewayin edit mode:kubectl edit gateway knative-ingress-gateway --namespace knative-servingUpdate the gateway to include the following
tls:section and configuration:tls: mode: SIMPLE privateKey: /etc/istio/ingressgateway-certs/tls.key serverCertificate: /etc/istio/ingressgateway-certs/tls.crtExample:
apiVersion: networking.istio.io/v1alpha3
kind: Gateway
metadata:
  # ... skipped ...
spec:
  selector:
    istio: ingressgateway
  servers:
    - hosts:
        - "*"
      port:
        name: http
        number: 80
        protocol: HTTP
    - hosts:
        - "*"
      port:
        name: https
        number: 443
        protocol: HTTPS
      tls:
        mode: SIMPLE
        privateKey: /etc/istio/ingressgateway-certs/tls.key
        serverCertificate: /etc/istio/ingressgateway-certs/tls.crt
After your changes are running on your Knative cluster, you can begin using the HTTPS protocol for secure access your deployed Knative services. In the event a mistake is made during this process and you need to update the cert, you must edit the gateway
knative-ingress-gatewayto switch back toPASSTHROUGHmode. Once corrections are made, edit the file again so the gateway uses the new certificates.
Using an older version of gitlabktl
There may be situations where you want to run an older version of gitlabktl. This
requires setting an older version of the gitlabktl image in the .gitlab-ci.yml file.
To set an older version, add image: to the functions:deploy block. For example:
functions:deploy:
  extends: .serverless:deploy:functions
  environment: production
  image: registry.gitlab.com/gitlab-org/gitlabktl:0.5.0
Different versions are available by changing the version tag at the end of the registry URL in the
format registry.gitlab.com/gitlab-org/gitlabktl:<version>.
For a full inventory of available gitlabktl versions, see the gitlabktl project's
container registry.