SAML SSO for GitLab.com groups (PREMIUM SAAS)
Introduced in GitLab 11.0.
This page describes SAML for groups. For instance-wide SAML on self-managed GitLab instances, see SAML OmniAuth Provider. View the differences between SaaS and Self-Managed Authentication and Authorization Options.
SAML on GitLab.com allows users to sign in through their SAML identity provider. If the user is not already a member, the sign-in process automatically adds the user to the appropriate group.
User synchronization of SAML SSO groups is supported through SCIM. SCIM supports adding and removing users from the GitLab group automatically. For example, if you remove a user from the SCIM app, SCIM removes that same user from the GitLab group.
SAML SSO is only configurable at the top-level group.
If required, you can find a glossary of common terms.
Configure your identity provider
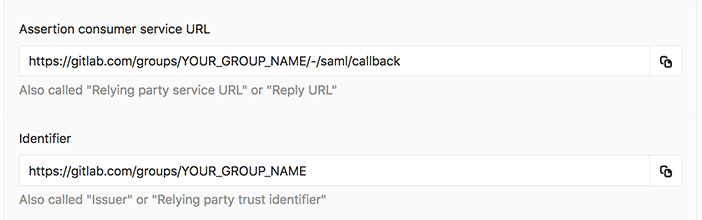
- Find the information in GitLab required for configuration:
- On the top bar, select Menu > Groups and find your group.
- On the left sidebar, select Settings > SAML SSO.
- Note the Assertion consumer service URL, Identifier, and GitLab single sign-on URL.
- Configure your SAML identity provider app using the noted details. Alternatively, GitLab provides a metadata XML configuration. See specific identity provider documentation for more details.
- Configure the SAML response to include a NameID that uniquely identifies each user.
- Configure the required user attributes, ensuring you include the user's email address.
- While the default is enabled for most SAML providers, please ensure the app is set to have service provider initiated calls in order to link existing GitLab accounts.
- Once the identity provider is set up, move on to configuring GitLab.
If your account is the only owner in the group after SAML is set up, you can't unlink the account. To unlink the account, set up another user as a group owner.
NameID
GitLab.com uses the SAML NameID to identify users. The NameID element:
- Is a required field in the SAML response.
- Must be unique to each user.
- Must be a persistent value that never changes, such as a randomly generated unique user ID.
- Is case sensitive. The NameID must match exactly on subsequent login attempts, so should not rely on user input that could change between upper and lower case.
- Should not be an email address or username. We strongly recommend against these as it's hard to guarantee it doesn't ever change, for example, when a person's name changes. Email addresses are also case-insensitive, which can result in users being unable to sign in.
The relevant field name and recommended value for supported providers are in the provider specific notes. appropriate corresponding field.
WARNING:
Once users have signed into GitLab using the SSO SAML setup, changing the NameID breaks the configuration and potentially locks users out of the GitLab group.
NameID Format
We recommend setting the NameID format to Persistent unless using a field (such as email) that requires a different format.
Most NameID formats can be used, except Transient due to the temporary nature of this format.
User attributes
To create users with the correct information for improved user access and management,
the user's details must be passed to GitLab as attributes in the SAML assertion. At a minimum, the user's email address
must be specified as an attribute named email or mail.
You can configure the following attributes with GitLab.com Group SAML:
-
usernameornickname. We recommend you configure only one of these. - The attributes available to self-managed GitLab instances.
Metadata configuration
GitLab provides metadata XML that can be used to configure your identity provider.
- On the top bar, select Menu > Groups and find your group.
- On the left sidebar, select Settings > SAML SSO.
- Copy the provided GitLab metadata URL.
- Follow your identity provider's documentation and paste the metadata URL when it's requested.
Configure GitLab
After you set up your identity provider to work with GitLab, you must configure GitLab to use it for authentication:
- On the top bar, select Menu > Groups and find your group.
- On the left sidebar, select Settings > SAML SSO.
- Find the SSO URL from your identity provider and enter it the Identity provider single sign-on URL field.
- Find and enter the fingerprint for the SAML token signing certificate in the Certificate field.
- Select the access level to be applied to newly added users in the Default membership role field. The default access level is 'Guest'.
- Select the Enable SAML authentication for this group checkbox.
- Select the Save changes button.

NOTE: The certificate fingerprint algorithm must be in SHA1. When configuring the identity provider, use a secure signature algorithm.
SSO enforcement
- Introduced in GitLab 11.8.
- Improved in GitLab 11.11 with ongoing enforcement in the GitLab UI.
- Improved in GitLab 13.8, with an updated timeout experience.
- Improved in GitLab 13.8 with allowing group owners to not go through SSO.
- Improved in GitLab 13.11 with enforcing open SSO session to use Git if this setting is switched on.
- Improved in GitLab 14.7 to not enforce SSO checks for Git activity originating from CI/CD jobs.
With this option enabled, users must access GitLab using your group GitLab single sign-on URL to access group resources. Users can't be added as new members manually. Users with the Owner role can use the standard sign in process to make necessary changes to top-level group settings.
SSO enforcement does not affect sign in or access to any resources outside of the group. Users can view which groups and projects they are a member of without SSO sign in.
However, users are not prompted to sign in through SSO on each visit. GitLab checks whether a user has authenticated through SSO. If it's been more than 1 day since the last sign-in, GitLab prompts the user to sign in again through SSO.
An issue exists to add a similar SSO requirement for API activity.
SSO has the following effects when enabled:
- For groups, users can't share a project in the group outside the top-level group, even if the project is forked.
- For Git activity over SSH and HTTPS, users must have at least one active session signed-in through SSO before they can push to or pull from a GitLab repository.
- Git activity originating from CI/CD jobs do not have the SSO check enforced.
- Credentials that are not tied to regular users (for example, access tokens and deploy keys) do not have the SSO check enforced.
- Users must be signed-in through SSO before they can pull images using the Dependency Proxy.
When SSO is enforced, users are not immediately revoked. If the user:
- Is signed out, they cannot access the group after being removed from the identity provider.
- Has an active session, they can continue accessing the group for up to 24 hours until the identity provider session times out.
Providers
The SAML standard means that you can use a wide range of identity providers with GitLab. Your identity provider might have relevant documentation. It can be generic SAML documentation or specifically targeted for GitLab.
When configuring your identity provider, please consider the notes below for specific providers to help avoid common issues and as a guide for terminology used.
For providers not listed below, you can refer to the instance SAML notes on configuring an identity provider for additional guidance on information your identity provider may require.
GitLab provides the following information for guidance only. If you have any questions on configuring the SAML app, please contact your provider's support.
Azure setup notes
Follow the Azure documentation on configuring single sign-on to applications with the notes below for consideration.
For a demo of the Azure SAML setup including SCIM, see SCIM Provisioning on Azure Using SAML SSO for Groups Demo. The video is outdated in regard to objectID mapping and the SCIM documentation should be followed.
| GitLab Setting | Azure Field |
|---|---|
| Identifier | Identifier (Entity ID) |
| Assertion consumer service URL | Reply URL (Assertion Consumer Service URL) |
| GitLab single sign-on URL | Sign on URL |
| Identity provider single sign-on URL | Login URL |
| Certificate fingerprint | Thumbprint |
The recommended attributes and claims settings are:
-
Unique User Identifier (Name identifier) set to
user.objectID. - nameid-format set to persistent.
- Additional claims set to supported attributes.
If using Group Sync, customize the name of the group claim to match the required attribute.
See the troubleshooting page for an example configuration.
Okta setup notes
Please follow the Okta documentation on setting up a SAML application in Okta with the notes below for consideration.
For a demo of the Okta SAML setup including SCIM, see Demo: Okta Group SAML & SCIM setup.
| GitLab Setting | Okta Field |
|---|---|
| Identifier | Audience URI |
| Assertion consumer service URL | Single sign-on URL |
| GitLab single sign-on URL | Login page URL (under Application Login Page settings) |
| Identity provider single sign-on URL | Identity Provider Single Sign-On URL |
Under Okta's Single sign-on URL field, check the option Use this for Recipient URL and Destination URL.
For NameID, the following settings are recommended; for SCIM, the following settings are required:
-
Application username (NameID) set to Custom
user.getInternalProperty("id"). - Name ID Format set to Persistent.
OneLogin setup notes
OneLogin supports their own GitLab (SaaS) application.
If you decide to use the OneLogin generic SAML Test Connector (Advanced), we recommend the "Use the OneLogin SAML Test Connector" documentation with the following settings:
| GitLab Setting | OneLogin Field |
|---|---|
| Identifier | Audience |
| Assertion consumer service URL | Recipient |
| Assertion consumer service URL | ACS (Consumer) URL |
| Assertion consumer service URL (escaped version) | ACS (Consumer) URL Validator |
| GitLab single sign-on URL | Login URL |
| Identity provider single sign-on URL | SAML 2.0 Endpoint |
Recommended NameID value: OneLogin ID.
Change the SAML app
To change the SAML app used for sign in:
- If the NameID is not identical in both the existing and new SAML apps, users must:
- Unlink the current SAML identity.
- Link their identity to the new SAML app.
- If the NameID is identical, no change is required.
Migrate to a different SAML provider
You can migrate to a different SAML provider. During the migration process users will not be able to access any of the SAML groups. To mitigate this, you can disable SSO enforcement.
To migrate SAML providers:
- Configure the group with the new identity provider SAML app.
- Ask users to unlink their account from the group.
- Ask users to link their account to the new SAML app.
Change email domains
To migrate users to a new email domain, users must:
- Add their new email as the primary email to their accounts and verify it.
- Unlink their account from the group.
- Link their account to the group.
- (Optional) Remove their old email from the account.
User access and management
SAML user provisioning introduced in GitLab 13.7.
Once Group SSO is configured and enabled, users can access the GitLab.com group through the identity provider's dashboard. If SCIM is configured, please see the user access and linking setup section on the SCIM page.
When a user tries to sign in with Group SSO, GitLab attempts to find or create a user based on the following:
- Find an existing user with a matching SAML identity. This would mean the user either had their account created by SCIM or they have previously signed in with the group's SAML IdP.
- If there is no conflicting user with the same email address, create a new account automatically.
- If there is a conflicting user with the same email address, redirect the user to the sign-in page to:
- Create a new account with another email address.
- Sign-in to their existing account to link the SAML identity.
Linking SAML to your existing GitLab.com account
To link SAML to your existing GitLab.com account:
- Sign in to your GitLab.com account. Reset your password if necessary.
- Locate and visit the GitLab single sign-on URL for the group you're signing in to. A group owner can find this on the group's Settings > SAML SSO page. If the sign-in URL is configured, users can connect to the GitLab app from the identity provider.
- Select Authorize.
- Enter your credentials on the identity provider if prompted.
- You are then redirected back to GitLab.com and should now have access to the group. In the future, you can use SAML to sign in to GitLab.com.
On subsequent visits, you should be able to go sign in to GitLab.com with SAML or by visiting links directly. If the enforce SSO option is turned on, you are then redirected to sign in through the identity provider.
Signing in to GitLab.com with SAML
- Sign in to your identity provider.
- From the list of apps, select the "GitLab.com" app. (The name is set by the administrator of the identity provider.)
- You are then signed in to GitLab.com and redirected to the group.
Configure user settings from SAML response
Introduced in GitLab 13.7.
GitLab allows setting certain user attributes based on values from the SAML response. Existing users will have these attributes updated if the user was originally provisioned by the group. Users are provisioned by the group when the account was created via SCIM or by first sign-in with SAML SSO for GitLab.com groups.
Supported user attributes
-
can_create_group- 'true' or 'false' to indicate whether the user can create new groups. Default istrue. -
projects_limit- The total number of personal projects a user can create. A value of0means the user cannot create new projects in their personal namespace. Default is10000.
Example SAML response
You can find SAML responses in the developer tools or console of your browser, in base64-encoded format. Use the base64 decoding tool of your choice to convert the information to XML. An example SAML response is shown here.
   <saml2:AttributeStatement>
      <saml2:Attribute Name="email" NameFormat="urn:oasis:names:tc:SAML:2.0:attrname-format:basic">
         <saml2:AttributeValue xmlns:xs="http://www.w3.org/2001/XMLSchema" xmlns:xsi="http://www.w3.org/2001/XMLSchema-instance" xsi:type="xs:string">user.email</saml2:AttributeValue>
      </saml2:Attribute>
      <saml2:Attribute Name="username" NameFormat="urn:oasis:names:tc:SAML:2.0:attrname-format:basic">
        <saml2:AttributeValue xmlns:xs="http://www.w3.org/2001/XMLSchema" xmlns:xsi="http://www.w3.org/2001/XMLSchema-instance" xsi:type="xs:string">user.nickName</saml2:AttributeValue>
      </saml2:Attribute>
      <saml2:Attribute Name="first_name" NameFormat="urn:oasis:names:tc:SAML:2.0:attrname-format:unspecified">
         <saml2:AttributeValue xmlns:xs="http://www.w3.org/2001/XMLSchema" xmlns:xsi="http://www.w3.org/2001/XMLSchema-instance" xsi:type="xs:string">user.firstName</saml2:AttributeValue>
      </saml2:Attribute>
      <saml2:Attribute Name="last_name" NameFormat="urn:oasis:names:tc:SAML:2.0:attrname-format:unspecified">
         <saml2:AttributeValue xmlns:xs="http://www.w3.org/2001/XMLSchema" xmlns:xsi="http://www.w3.org/2001/XMLSchema-instance" xsi:type="xs:string">user.lastName</saml2:AttributeValue>
      </saml2:Attribute>
      <saml2:Attribute Name="can_create_group" NameFormat="urn:oasis:names:tc:SAML:2.0:attrname-format:unspecified">
         <saml2:AttributeValue xmlns:xs="http://www.w3.org/2001/XMLSchema" xmlns:xsi="http://www.w3.org/2001/XMLSchema-instance" xsi:type="xs:string">true</saml2:AttributeValue>
      </saml2:Attribute>
      <saml2:Attribute Name="projects_limit" NameFormat="urn:oasis:names:tc:SAML:2.0:attrname-format:unspecified">
         <saml2:AttributeValue xmlns:xs="http://www.w3.org/2001/XMLSchema" xmlns:xsi="http://www.w3.org/2001/XMLSchema-instance" xsi:type="xs:string">10</saml2:AttributeValue>
      </saml2:Attribute>
   </saml2:AttributeStatement>
Role
Starting from GitLab 13.3, group owners can set a "Default membership role" other than Guest. To do so, configure the SAML SSO for the group. That role becomes the starting access level of all users added to the group.
Existing members with appropriate privileges can promote or demote users, as needed.
If a user is already a member of the group, linking the SAML identity does not change their role.
Users given a "minimal access" role have specific restrictions.
Blocking access
To rescind a user's access to the group when only SAML SSO is configured, either:
- Remove (in order) the user from:
- The user data store on the identity provider or the list of users on the specific app.
- The GitLab.com group.
- Use Group Sync at the top-level of your group to automatically remove the user.
To rescind a user's access to the group when also using SCIM, refer to Blocking access.
Unlinking accounts
Users can unlink SAML for a group from their profile page. This can be helpful if:
- You no longer want a group to be able to sign you in to GitLab.com.
- Your SAML NameID has changed and so GitLab can no longer find your user.
WARNING: Unlinking an account removes all roles assigned to that user in the group. If a user re-links their account, roles need to be reassigned.
Groups require at least one owner. If your account is the only owner in the group, you are not allowed to unlink the account. In that case, set up another user as a group owner, and then you can unlink the account.
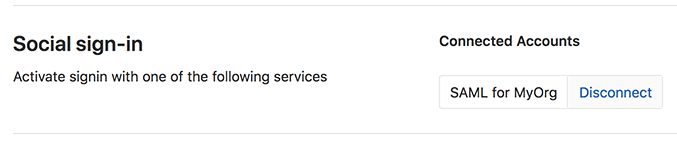
For example, to unlink the MyOrg account:
- On the top bar, in the top right corner, select your avatar.
- Select Edit profile.
- On the left sidebar, select Account.
- In the Social sign-in section, select Disconnect next to the connected account.
Group Sync
WARNING:
Changing Group Sync configuration can remove users from the relevant GitLab group.
Removal happens if there is any mismatch between the group names and the list of groups in the SAML response.
If changes must be made, ensure either the SAML response includes the groups attribute
and the AttributeValue value matches the SAML Group Name in GitLab,
or that all groups are removed from GitLab to disable Group Sync.
For a demo of Group Sync using Azure, see Demo: SAML Group Sync.
When the SAML response includes a user and their group memberships from the SAML identity provider, GitLab uses that information to automatically manage that user's GitLab group memberships.
Ensure your SAML identity provider sends an attribute statement named Groups or groups like the following:
<saml:AttributeStatement>
  <saml:Attribute Name="Groups">
    <saml:AttributeValue xsi:type="xs:string">Developers</saml:AttributeValue>
    <saml:AttributeValue xsi:type="xs:string">Product Managers</saml:AttributeValue>
  </saml:Attribute>
</saml:AttributeStatement>
Other attribute names such as http://schemas.microsoft.com/ws/2008/06/identity/claims/groups
are not accepted as a source of groups.
See the SAML troubleshooting page
for examples on configuring the required attribute name in the SAML identity provider's settings.
NOTE:
The value for Groups or groups in the SAML response can be either the group name or the group ID.
To inspect the SAML response, you can use one of these SAML debugging tools.
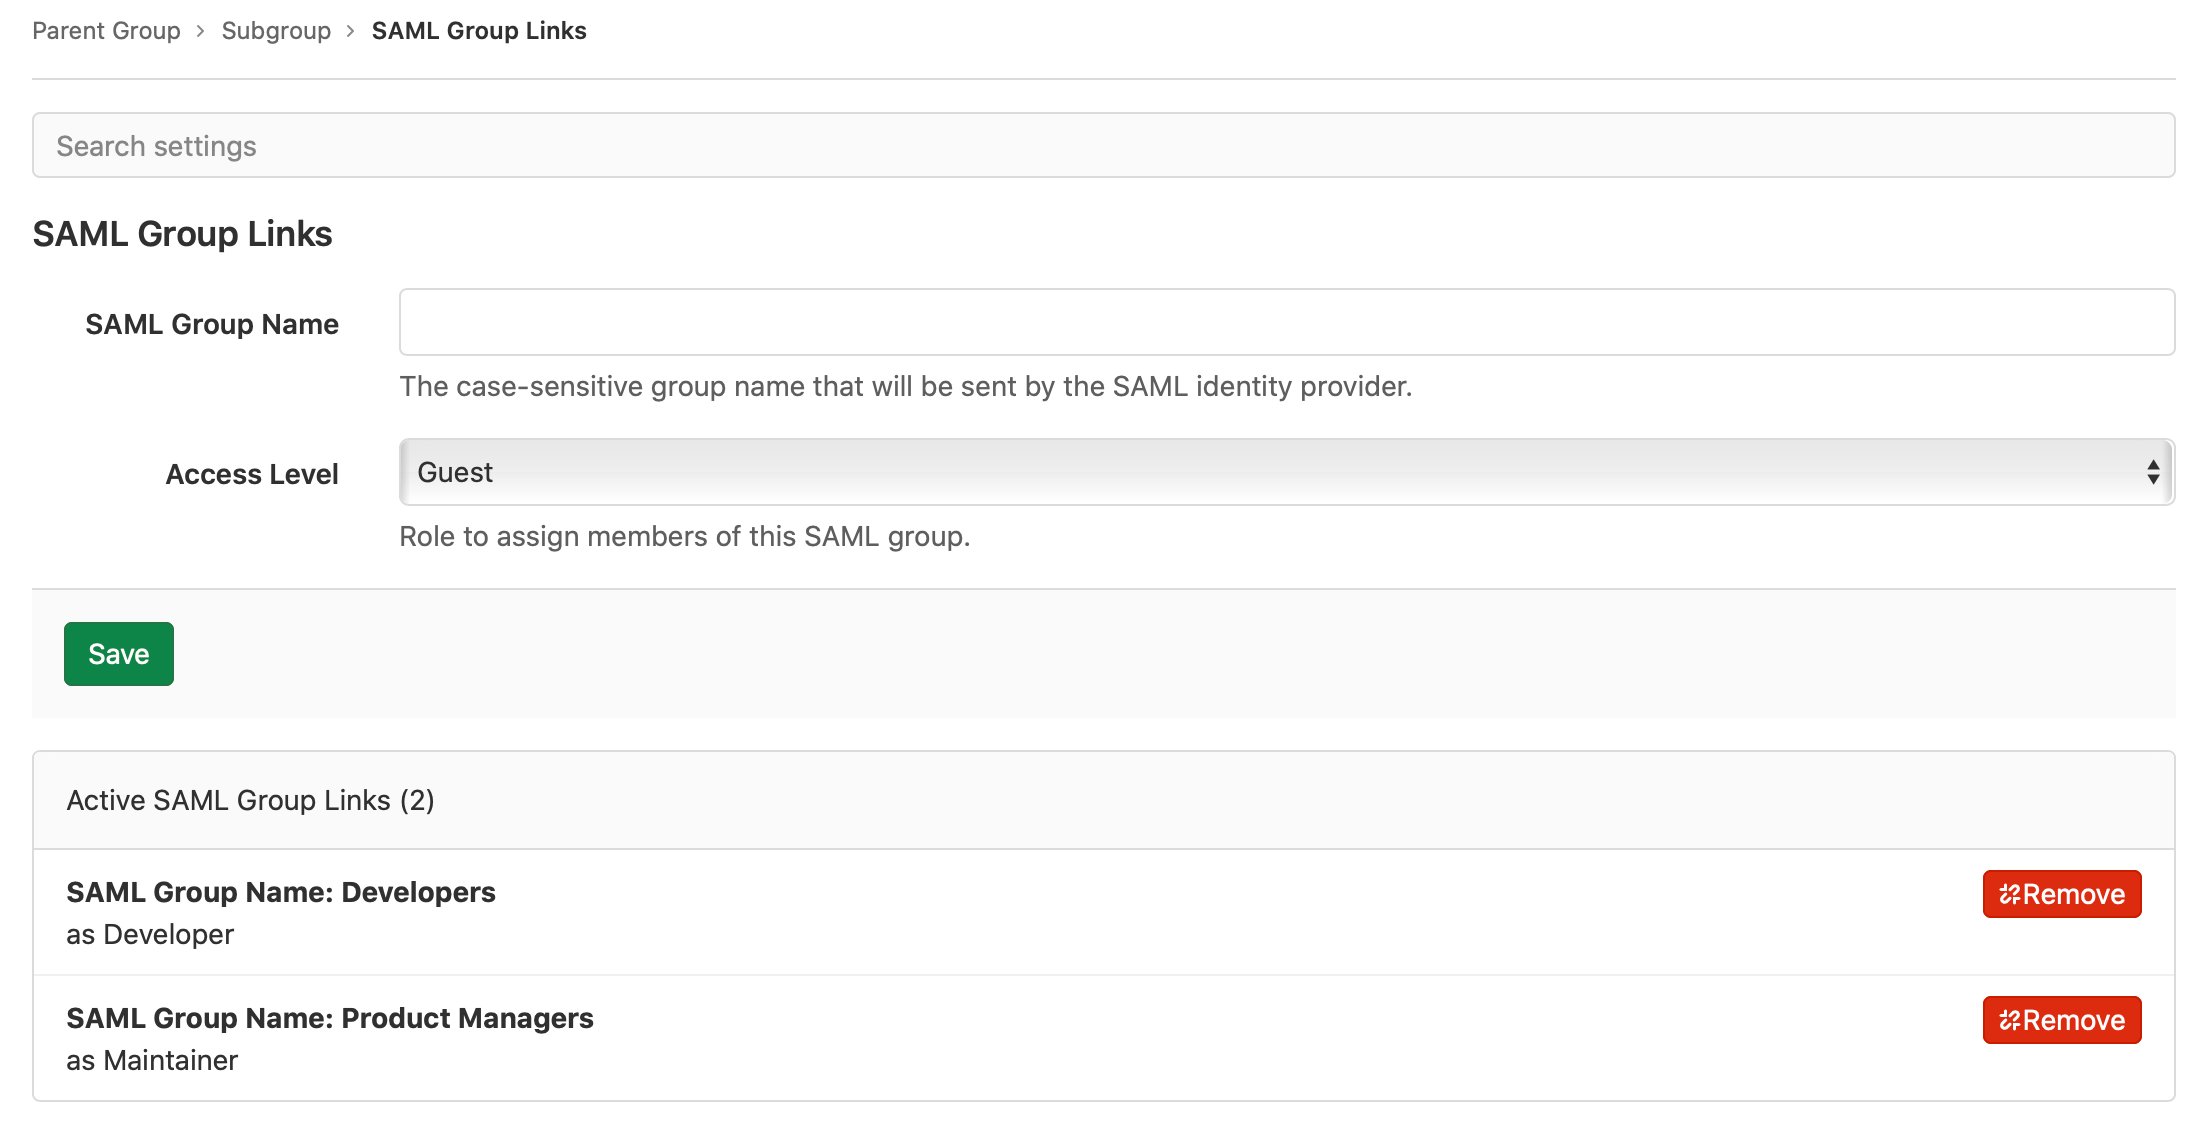
When SAML SSO is enabled for the top-level group, Maintainer and Owner level users
see a new menu item in group Settings > SAML Group Links. You can configure one or more SAML Group Links to map
a SAML identity provider group name to a GitLab Access Level. This can be done for the parent group or the subgroups.
To link the SAML groups from the saml:AttributeStatement example above:
- In the SAML Group Name box, enter the value of
saml:AttributeValue. - Choose the desired Access Level.
- Save the group link.
- Repeat to add additional group links if desired.
If a user is a member of multiple SAML groups mapped to the same GitLab group,
the user gets the highest access level from the groups. For example, if one group
is linked as Guest and another Maintainer, a user in both groups gets Maintainer
access.
Users granted:
- A higher role with Group Sync are displayed as having direct membership of the group.
- A lower or the same role with Group Sync are displayed as having inherited membership of the group.
Automatic member removal
After a group sync, users who are not members of a mapped SAML group are removed from the GitLab group. Even if SSO authentication is successful, if an existing user is not a member of any of the configured groups:
- They get an "unauthorized" message if they try to view the group.
- All of their permissions to subgroups and projects are also removed.
For example, in the following diagram:
- Alex Garcia signs into GitLab and is removed from GitLab Group C because they don't belong to SAML Group C.
- Sidney Jones belongs to SAML Group C, but is not added to GitLab Group C because they have not yet signed in.
graph TB
   subgraph SAML users
      SAMLUserA[Sidney Jones]
      SAMLUserB[Zhang Wei]
      SAMLUserC[Alex Garcia]
      SAMLUserD[Charlie Smith]
   end

   subgraph SAML groups
      SAMLGroupA["Group A"] --> SAMLGroupB["Group B"]
      SAMLGroupA --> SAMLGroupC["Group C"]
      SAMLGroupA --> SAMLGroupD["Group D"]
   end

   SAMLGroupB --> |Member|SAMLUserA
   SAMLGroupB --> |Member|SAMLUserB

   SAMLGroupC --> |Member|SAMLUserA
   SAMLGroupC --> |Member|SAMLUserB

   SAMLGroupD --> |Member|SAMLUserD
   SAMLGroupD --> |Member|SAMLUserC
graph TB
subgraph GitLab users
GitLabUserA[Sidney Jones]
GitLabUserB[Zhang Wei]
GitLabUserC[Alex Garcia]
GitLabUserD[Charlie Smith]
end
subgraph GitLab groups
GitLabGroupA["Group A (SAML configured)"] --> GitLabGroupB["Group B (SAML Group Link not configured)"]
GitLabGroupA --> GitLabGroupC["Group C (SAML Group Link configured)"]
GitLabGroupA --> GitLabGroupD["Group D (SAML Group Link configured)"]
end
GitLabGroupB --> |Member|GitLabUserA
GitLabGroupC --> |Member|GitLabUserB
GitLabGroupC --> |Member|GitLabUserC
GitLabGroupD --> |Member|GitLabUserC
GitLabGroupD --> |Member|GitLabUserDgraph TB
subgraph GitLab users
GitLabUserA[Sidney Jones]
GitLabUserB[Zhang Wei]
GitLabUserC[Alex Garcia]
GitLabUserD[Charlie Smith]
end
subgraph GitLab groups after Alex Garcia signs in
GitLabGroupA[Group A]
GitLabGroupA["Group A (SAML configured)"] --> GitLabGroupB["Group B (SAML Group Link not configured)"]
GitLabGroupA --> GitLabGroupC["Group C (SAML Group Link configured)"]
GitLabGroupA --> GitLabGroupD["Group D (SAML Group Link configured)"]
end
GitLabGroupB --> |Member|GitLabUserA
GitLabGroupC --> |Member|GitLabUserB
GitLabGroupD --> |Member|GitLabUserC
GitLabGroupD --> |Member|GitLabUserDPasswords for users created via SAML SSO for Groups
The Generated passwords for users created through integrated authentication guide provides an overview of how GitLab generates and sets passwords for users created via SAML SSO for Groups.
Troubleshooting
This section contains possible solutions for problems you might encounter.
SAML debugging tools
SAML responses are base64 encoded, so we recommend the following browser plugins to decode them on the fly:
Specific attention should be paid to:
- The NameID, which we use to identify which user is signing in. If the user has previously signed in, this must match the value we have stored.
- The presence of a
X509Certificate, which we require to verify the response signature. - The
SubjectConfirmationandConditions, which can cause errors if misconfigured.
Generate a SAML Response
SAML Responses can be used to preview the attribute names and values sent in the assertions list while attempting to sign in using an IdP.
To generate a SAML Response:
- Install either:
- SAML Chrome Panel for Chrome.
- SAML-tracer for Firefox.
- Open a new browser tab.
- Open the SAML tracer console:
- Chrome: Right click on the page, select Inspect, then click on the SAML tab in the opened developer console.
- Firefox: Select the SAML-tracer icon located on the browser toolbar.
- Go to the GitLab single sign-on URL for the group in the same browser tab with the SAML tracer open.
- Select Authorize or attempt to log in. A SAML response is displayed in the tracer console that resembles this example SAML response.
- Within the SAML tracer, select the Export icon to save the response in JSON format.
Verifying configuration
For convenience, we've included some example resources used by our Support Team. While they may help you verify the SAML app configuration, they are not guaranteed to reflect the current state of third-party products.
Verifying NameID
In troubleshooting the Group SAML setup, any authenticated user can use the API to verify the NameID GitLab already has linked to the user by visiting https://gitlab.com/api/v4/user and checking the extern_uid under identities.
Similarly, group members of a role with the appropriate permissions can make use of the members API to view group SAML identity information for members of the group.
This can then be compared to the NameID being sent by the identity provider by decoding the message with a SAML debugging tool. We require that these match in order to identify users.
Users receive a 404
If you receive a 404 during setup when using "verify configuration", make sure you have used the correct
SHA-1 generated fingerprint.
If a user is trying to sign in for the first time and the GitLab single sign-on URL has not been configured, they may see a 404. As outlined in the user access section, a group Owner needs to provide the URL to users.
Message: "SAML authentication failed: Extern UID has already been taken"
This error suggests you are signed in as a GitLab user but have already linked your SAML identity to a different GitLab user. Sign out and then try to sign in again using the SSO SAML link, which should log you into GitLab with the linked user account.
If you do not wish to use that GitLab user with the SAML login, you can unlink the GitLab account from the group's SAML.
Message: "SAML authentication failed: User has already been taken"
The user that you're signed in with already has SAML linked to a different identity, or the NameID value has changed. Here are possible causes and solutions:
| Cause | Solution |
|---|---|
| You've tried to link multiple SAML identities to the same user, for a given identity provider. | Change the identity that you sign in with. To do so, unlink the previous SAML identity from this GitLab account before attempting to sign in again. |
| The NameID changes everytime the user requests SSO identification | Check the NameID is not set with Transient format, or the NameID is not changing on subsequent requests. |
Message: "SAML authentication failed: Email has already been taken"
| Cause | Solution |
|---|---|
| When a user account with the email address already exists in GitLab, but the user does not have the SAML identity tied to their account. | The user needs to link their account. |
User accounts are created in one of the following ways:
- User registration
- Sign in through OAuth
- Sign in through SAML
- SCIM provisioning
Message: "SAML authentication failed: Extern UID has already been taken, User has already been taken"
Getting both of these errors at the same time suggests the NameID capitalization provided by the identity provider didn't exactly match the previous value for that user.
This can be prevented by configuring the NameID to return a consistent value. Fixing this for an individual user involves unlinking SAML in the GitLab account, although this causes group membership and to-do items to be lost.
Message: "Request to link SAML account must be authorized"
Ensure that the user who is trying to link their GitLab account has been added as a user within the identity provider's SAML app.
Alternatively, the SAML response may be missing the InResponseTo attribute in the
samlp:Response tag, which is expected by the SAML gem.
The identity provider administrator should ensure that the login is
initiated by the service provider and not the identity provider.
Message: "Login to a GitLab account to link with your SAML identity"
A user can see this message when they are trying to manually link SAML to their existing GitLab.com account.
To resolve this problem, the user should check they are using the correct GitLab password to log in. They first need to reset their password if both:
- The account was provisioned by SCIM.
- This is the first time the user has logged in the username and password.
Stuck in a login "loop"
Ensure that the GitLab single sign-on URL has been configured as "Login URL" (or similarly named field) in the identity provider's SAML app.
Alternatively, when users need to link SAML to their existing GitLab.com account, provide the GitLab single sign-on URL and instruct users not to use the SAML app on first sign in.
The NameID has changed
| Cause | Solution |
|---|---|
| As mentioned in the NameID section, if the NameID changes for any user, the user can be locked out. This is a common problem when an email address is used as the identifier. | Follow the steps outlined in the "SAML authentication failed: User has already been taken" section. |
I need additional information to configure my identity provider
Many SAML terms can vary between providers. It is possible that the information you are looking for is listed under another name.
For more information, start with your identity provider's documentation. Look for their options and examples to see how they configure SAML. This can provide hints on what you need to configure GitLab to work with these providers.
It can also help to look at our more detailed docs for self-managed GitLab.
SAML configuration for GitLab.com is mostly the same as for self-managed instances.
However, self-managed GitLab instances use a configuration file that supports more options as described in the external OmniAuth SAML documentation.
Internally that uses the ruby-saml library, so we sometimes check there to verify low level details of less commonly used options.
It can also help to compare the XML response from your provider with our example XML used for internal testing.
Searching Rails log
With access to the rails log or production_json.log (available only to GitLab team members for GitLab.com),
you should be able to find the base64 encoded SAML response by searching with the following filters:
-
json.meta.caller_id:Groups::OmniauthCallbacksController#group_saml -
json.meta.userorjson.username:username -
json.method:POST -
json.path:/groups/GROUP-PATH/-/saml/callback
In a relevant log entry, the json.params should provide a valid response with:
-
"key": "SAMLResponse"and the"value": (full SAML response), -
"key": "RelayState"with"value": "/group-path", and -
"key": "group_id"with"value": "group-path".
In some cases, if the SAML response is lengthy, you may receive a "key": "truncated" with "value":"...".
In these cases, please ask a group owner for a copy of the SAML response from when they select
the "Verify SAML Configuration" button on the group SSO Settings page.
Use a base64 decoder to see a human-readable version of the SAML response.