SCIM provisioning using SAML SSO for GitLab.com groups (PREMIUM SAAS)
Introduced in GitLab 11.10.
System for Cross-domain Identity Management (SCIM), is an open standard that enables the automation of user provisioning. When SCIM is provisioned for a GitLab group, membership of that group is synchronized between GitLab and the identity provider.
The GitLab SCIM API implements part of the RFC7644 protocol.
Features
The following actions are available:
- Create users
- Remove users (deactivate SCIM identity)
The following identity providers are supported:
- Azure
- Okta
Requirements
- Group Single Sign-On must be configured.
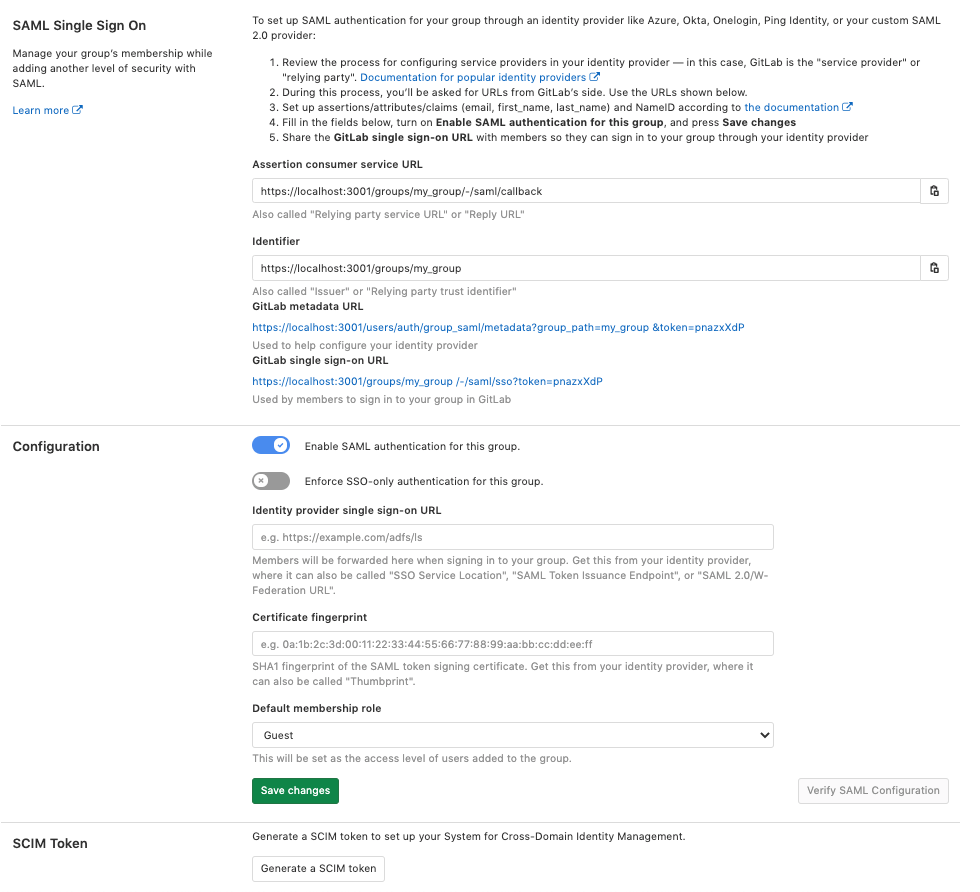
GitLab configuration
Once Group Single Sign-On has been configured, we can:
- On the top bar, select Menu > Groups and find your group.
- On the left sidebar, select Settings > SAML SSO.
- Select Generate a SCIM token.
- Save the token and URL for use in the next step.
Identity Provider configuration
Azure configuration steps
The SAML application that was created during Single sign-on setup for Azure now needs to be set up for SCIM. You can refer to Azure SCIM setup documentation.
-
In your app, go to the Provisioning tab, and set the Provisioning Mode to Automatic. Then fill in the Admin Credentials, and save. The Tenant URL and secret token are the items retrieved in the previous step.
-
After saving, two more tabs appear:
-
Settings: We recommend setting a notification email and selecting the Send an email notification when a failure occurs checkbox. You also control what is actually synced by selecting the Scope. For example, Sync only assigned users and groups only syncs the users and groups assigned to the application. Otherwise, it syncs the whole Active Directory.
-
Mappings: We recommend keeping Provision Azure Active Directory Users enabled, and disable Provision Azure Active Directory Groups. Leaving Provision Azure Active Directory Groups enabled does not break the SCIM user provisioning, but it causes errors in Azure AD that may be confusing and misleading.
-
-
You can then test the connection by selecting Test Connection. If the connection is successful, save your configuration before moving on. See below for troubleshooting.
Configure attribute mapping
Follow Azure documentation to configure the attribute mapping.
The following table below provides an attribute mapping known to work with GitLab. If
your SAML configuration differs from the recommended SAML settings,
modify the corresponding customappsso settings accordingly. If a mapping is not listed in the
table, use the Azure defaults. For a list of required attributes, refer to the SCIM API documentation.
| Azure Active Directory Attribute |
customappsso Attribute |
Matching precedence |
|---|---|---|
objectId |
externalId |
1 |
userPrincipalName |
emails[type eq "work"].value |
|
mailNickname |
userName |
For guidance, you can view an example configuration in the troubleshooting reference.
-
Below the mapping list click on Show advanced options > Edit attribute list for AppName.
-
Ensure the
idis the primary and required field, andexternalIdis also required.NOTE:
usernameshould neither be primary nor required as we don't support that field on GitLab SCIM yet. -
Save all changes.
-
In the Provisioning step, set the
Provisioning StatustoOn.
Once enabled, the synchronization details and any errors appears on the bottom of the Provisioning screen, together with a link to the audit events.
WARNING:
Once synchronized, changing the field mapped to id and externalId may cause a number of errors. These include provisioning errors, duplicate users, and may prevent existing users from accessing the GitLab group.
Okta configuration steps
Before you start this section:
- Check that you are using Okta Lifecycle Management product. This product tier is required to use SCIM on Okta. To check which Okta product you are using, check your signed Okta contract, contact your Okta AE, CSM, or Okta support.
- Complete the GitLab configuration process.
- Complete the setup for SAML application for Okta, as described in the Okta setup notes.
- Check that your Okta SAML setup matches our documentation exactly, especially the NameID configuration. Otherwise, the Okta SCIM app may not work properly.
After the above steps are complete:
- Sign in to Okta.
- Ensure you are in the Admin section by selecting the Admin button located in the top right. The admin button is not visible from the admin page.
- In the Application tab, select Browse App Catalog.
- Search for GitLab, find and select on the 'GitLab' application.
- On the GitLab application overview page, select Add.
- Under Application Visibility select both checkboxes. Currently the GitLab application does not support SAML authentication so the icon should not be shown to users.
- Select Done to finish adding the application.
- In the Provisioning tab, select Configure API integration.
- Select Enable API integration.
- For Base URL enter the URL obtained from the GitLab SCIM configuration page
- For API Token enter the SCIM token obtained from the GitLab SCIM configuration page
- Select 'Test API Credentials' to verify configuration.
- Select Save to apply the settings.
- After saving the API integration details, new settings tabs appear on the left. Select To App.
- Select Edit.
- Select the Enable checkbox for both Create Users and Deactivate Users.
- Select Save.
- Assign users in the Assignments tab. Assigned users are created and managed in your GitLab group.
Okta Known Issues
The Okta GitLab application currently only supports SCIM. Continue using the separate Okta SAML SSO configuration along with the new SCIM application described above. An issue exists to add SAML support to the Okta GitLab application.
OneLogin
As the developers of this app, OneLogin provides a "GitLab (SaaS)" app in their catalog, which includes a SCIM integration. Please reach out to OneLogin if you encounter issues.
User access and linking setup
During the synchronization process, all of your users get GitLab accounts, welcoming them to their respective groups, with an invitation email. When implementing SCIM provisioning, you may want to warn your security-conscious employees about this email.
The following diagram is a general outline on what happens when you add users to your SCIM app:
graph TD
  A[Add User to SCIM app] -->|IdP sends user info to GitLab| B(GitLab: Does the email exist?)
  B -->|No| C[GitLab creates user with SCIM identity]
  B -->|Yes| D[GitLab sends message back 'Email exists']
During provisioning:
- Both primary and secondary emails are considered when checking whether a GitLab user account exists.
- Duplicate usernames are also handled, by adding suffix
1upon user creation. For example, due to already existingtest_userusername,test_user1is used.
If Group SAML has been configured and you have an existing GitLab.com account, you can link your SCIM and SAML identities:
- Update the primary email address in your GitLab.com user account to match the user profile email address in your identity provider.
- Link your SAML identity.
We recommend users do this prior to turning on sync, because while synchronization is active, there may be provisioning errors for existing users.
New users and existing users on subsequent visits can access the group through the identify provider's dashboard or by visiting links directly.
In GitLab 14.0 and later, GitLab users created by SAML SSO or SCIM provisioning display with an Enterprise badge in the Members view.
![]()
For role information, please see the Group SAML page
Blocking access
To rescind access to the top-level group, all sub-groups, and projects, remove or deactivate the user on the identity provider. After the identity provider performs a sync, based on its configured schedule, the user's membership is revoked and they lose access.
NOTE: Deprovisioning does not delete the GitLab user account.
graph TD
  A[Remove User from SCIM app] -->|IdP sends request to GitLab| B(GitLab: Is the user part of the group?)
  B -->|No| C[Nothing to do]
  B -->|Yes| D[GitLab removes user from GitLab group]
Troubleshooting
This section contains possible solutions for problems you might encounter.
How come I can't add a user after I removed them?
As outlined in the Blocking access section, when you remove a user, they are removed from the group. However, their account is not deleted.
When the user is added back to the SCIM app, GitLab cannot create a new user because the user already exists.
Solution: Have a user sign in directly to GitLab, then manually link their account.
How do I diagnose why a user is unable to sign in
Ensure that the user has been added to the SCIM app.
If you receive "User is not linked to a SAML account", then most likely the user already exists in GitLab. Have the user follow the User access and linking setup instructions.
The Identity (extern_uid) value stored by GitLab is updated by SCIM whenever id or externalId changes. Users cannot sign in unless the GitLab Identity (extern_uid) value matches the NameId sent by SAML.
This value is also used by SCIM to match users on the id, and is updated by SCIM whenever the id or externalId values change.
It is important that this SCIM id and SCIM externalId are configured to the same value as the SAML NameId. SAML responses can be traced using debugging tools, and any errors can be checked against our SAML troubleshooting docs.
How do I verify user's SAML NameId matches the SCIM externalId
Group owners can see the list of users and the externalId stored for each user in the group SAML SSO Settings page.
A possible alternative is to use the SCIM API to manually retrieve the externalId we have stored for users, also called the external_uid or NameId.
To see how the external_uid compares to the value returned as the SAML NameId, you can have the user use a SAML Tracer.
Update or fix mismatched SCIM externalId and SAML NameId
Whether the value was changed or you need to map to a different field, ensure id, externalId, and NameId all map to the same field.
If the GitLab externalId doesn't match the SAML NameId, it needs to be updated in order for the user to sign in. Ideally your identity provider is configured to do such an update, but in some cases it may be unable to do so, such as when looking up a user fails due to an ID change.
Be cautious if you revise the fields used by your SCIM identity provider, typically id and externalId.
We use these IDs to look up users. If the identity provider does not know the current values for these fields,
that provider may create duplicate users.
If the externalId for a user is not correct, and also doesn't match the SAML NameID,
you can address the problem in the following ways:
- You can have users unlink and relink themselves, based on the "SAML authentication failed: User has already been taken" section.
- You can unlink all users simultaneously, by removing all users from the SAML app while provisioning is turned on.
- It may be possible to use the SCIM API to manually correct the
externalIdstored for users to match the SAMLNameId. To look up a user, you need to know the desired value that matches theNameIdas well as the currentexternalId.
It is important not to update these to incorrect values, since this causes users to be unable to sign in. It is also important not to assign a value to the wrong user, as this causes users to get signed into the wrong account.
I need to change my SCIM app
Individual users can follow the instructions in the "SAML authentication failed: User has already been taken" section.
Alternatively, users can be removed from the SCIM app which de-links all removed users. Sync can then be turned on for the new SCIM app to link existing users.
The SCIM app is throwing "User has already been taken","status":409 error message
Changing the SAML or SCIM configuration or provider can cause the following problems:
| Problem | Solution |
|---|---|
| SAML and SCIM identity mismatch. | First verify that the user's SAML NameId matches the SCIM externalId and then update or fix the mismatched SCIM externalId and SAML NameId. |
| SCIM identity mismatch between GitLab and the Identify Provider SCIM app. | You can confirm whether you're hitting the error because of your SCIM identity mismatch between your SCIM app and GitLab.com by using SCIM API which shows up in the id key and compares it with the user externalId in the SCIM app. You can use the same SCIM API to update the SCIM id for the user on GitLab.com. |
Azure
How do I verify my SCIM configuration is correct?
Review the following:
- Ensure that the SCIM value for
idmatches the SAML value forNameId. - Ensure that the SCIM value for
externalIdmatches the SAML value forNameId.
Review the following SCIM parameters for sensible values:
userNamedisplayNameemails[type eq "work"].value
Testing Azure connection: invalid credentials
When testing the connection, you may encounter an error: You appear to have entered invalid credentials. Please confirm you are using the correct information for an administrative account. If Tenant URL and secret token are correct, check whether your group path contains characters that may be considered invalid JSON primitives (such as .). Removing such characters from the group path typically resolves the error.
(Field) can't be blank sync error
When checking the Audit Events for the Provisioning, you can sometimes see the
error Namespace can't be blank, Name can't be blank, and User can't be blank.
This is likely caused because not all required fields (such as first name and last name) are present for all users being mapped.
As a workaround, try an alternate mapping:
- Follow the Azure mapping instructions from above.
- Delete the
name.formattedtarget attribute entry. - Change the
displayNamesource attribute to havename.formattedtarget attribute.
Failed to match an entry in the source and target systems Group 'Group-Name'
Group provisioning in Azure can fail with the Failed to match an entry in the source and target systems Group 'Group-Name' error message,
and the error response can include a HTML result of the GitLab URL https://gitlab.com/users/sign_in.
This error is harmless and occurs because Group provisioning was turned on but GitLab SCIM integration does not support it nor require it. To
remove the error, follow the instructions in the Azure configuration guide to disable the option
Synchronize Azure Active Directory Groups to AppName.